On This Page
Creating and Using Security Keys User Guide
This section describes how to use this user guide and where to find further information.
- Related Documentation
- Visit theCybersourcedocumentation hub to find additional technical documentation.
- Customer Support
- For support information about any service, visit the Support Center:
Recent Revisions to This Document
26.01.01
Added support for the partner solution key, which allows reseller partners to use a technology
partner's solution to process payments on their behalf. See Partner Solution Key Set Up.
25.12.01
Updated information about how to create, submit, and test the API Response MLE
Certificate for the REST API. See REST—API Response MLE Key.
Changed title of the
Message-Level Encryption Keys
section to Token Management
MLE Keys. See Token Management MLE Keys.25.10.01
Added support for creating or submitting an API Response MLE Certificate for the REST
API. See Step 4A: Create or Submit a REST—API Response MLE Key.
25.08.01
Added support for submitting a certificate signing request (CSR) as a REST API key. See Submit a Certificate Signing Request.
25.04.01
Added information about
Cybersource
no longer supporting the SOAP
toolkit key type. See the important note in Introduction to Creating and Using Security Keys and SOAP Toolkit Keys.25.03.01
Updated the available filters for searching for keys. See Search and Export Keys Using Filters.
Updated how to create a meta key for portfolio users and merchant account users. See
Create a Meta Key as a Portfolio User and Create a Meta Key as a Merchant Account User.
Added information about removing a meta key from all merchants and select merchants.
See Remove a Meta Key from all Merchants and Remove a Meta Key from Select Merchants.
24.08.01
- This revision contains only editorial changes and no technical updates.
24.06.01
- This revision contains only editorial changes and no technical updates.
VISA Platform Connect: Specifications and Conditions for
Resellers/Partners
The following are specifications and conditions that apply to a Reseller/Partner enabling
its merchants through
Cybersource for
. Failure to meet any of the specifications and conditions below is
subject to the liability provisions and indemnification obligations under
Reseller/Partner’s contract with Visa/Cybersource.Visa Platform Connect
(“VPC”)
processing- Before boarding merchants for payment processing on a VPC acquirer’s connection, Reseller/Partner and the VPC acquirer must have a contract or other legal agreement that permits Reseller/Partner to enable its merchants to process payments with the acquirer through the dedicated VPC connection and/or traditional connection with such VPC acquirer.
- Reseller/Partner is responsible for boarding and enabling its merchants in accordance with the terms of the contract or other legal agreement with the relevant VPC acquirer.
- Reseller/Partner acknowledges and agrees that all considerations and fees associated with chargebacks, interchange downgrades, settlement issues, funding delays, and other processing related activities are strictly between Reseller and the relevant VPC acquirer.
- Reseller/Partner acknowledges and agrees that the relevant VPC acquirer is responsible for payment processing issues, including but not limited to, transaction declines by network/issuer, decline rates, and interchange qualification, as may be agreed to or outlined in the contract or other legal agreement between Reseller/Partner and such VPC acquirer.
DISCLAIMER: NEITHER VISA NOR CYBERSOURCE WILL BE RESPONSIBLE OR LIABLE FOR ANY ERRORS OR
OMISSIONS BY THE
Visa Platform Connect
ACQUIRER IN PROCESSING TRANSACTIONS. NEITHER VISA
NOR CYBERSOURCE WILL BE RESPONSIBLE OR LIABLE FOR RESELLER/PARTNER BOARDING MERCHANTS OR
ENABLING MERCHANT PROCESSING IN VIOLATION OF THE TERMS AND CONDITIONS IMPOSED BY THE
RELEVANT Visa Platform Connect
ACQUIRER. Introduction to Creating and Using Security Keys
Cybersource
requires you to use security keys when sending and receiving API
messages. This guide explains how to create and manage your security keys using the
Business Center
.A security key, also known as a
cryptographic key
, is a string of randomly or
mathematically generated characters that are tied to a specific cryptographic algorithm.
These keys are used to:- Encrypt plain text to allow users to send text across the internet with confidence that the content is secure.
- Decrypt the encrypted message so that the text can be read by the intended recipient.
- Validate that the encrypted message has not been tampered with while in transit.
These are the available
Cybersource
security keys:- Message-Level Encryption (MLE) Keys
- Meta Keys
- PGP Keys
- REST API Keys
- Secure Acceptance Keys
- Simple Order Keys
- SOAP Toolkit Keys
WARNING
Cybersource
will no longer support SOAP toolkit keys by these dates:- Test environment:July 16, 2025
- Production environment:August 13, 2025
If you are integrating to the Simple Order API, you can use the compliant
certificate-based
Simple Order key
. For more information, see Simple Order API Keys.If your payment
system currently uses the SOAP toolkit key, you can transition your payment
system to use the certificate-based Simple Order API key. For more information
about how to transition your payment system to use the compliant Simple Order
API keys for authentication, see the
P12 Authentication for SOAP Toolkit Key
Users Migration Guide
. Your API requests to Cybersource
will be rejected if you do not implement P12
authentication by the above dates.Additional Information
For more information about cryptographic keys, see the article on Wikipedia.
Create a Security Key
This section describes how to create your security keys using the
Business Center
.In the
Business Center
, you can use the Dashboard or Key Management to create your
keys. These keys can be downloaded for you to securely store in your system.Business Center Dashboard
Business Center
DashboardWhen you log in to
the
, the dashboard
appears. You can use the Security Keys dashboard to: Business Center
- View any keys that will expire soon.
- Go directly to the Key Management page by clickingView All Keys.
- Create a new key by clickingGenerate new key.
Figure:
Business Center
Dashboard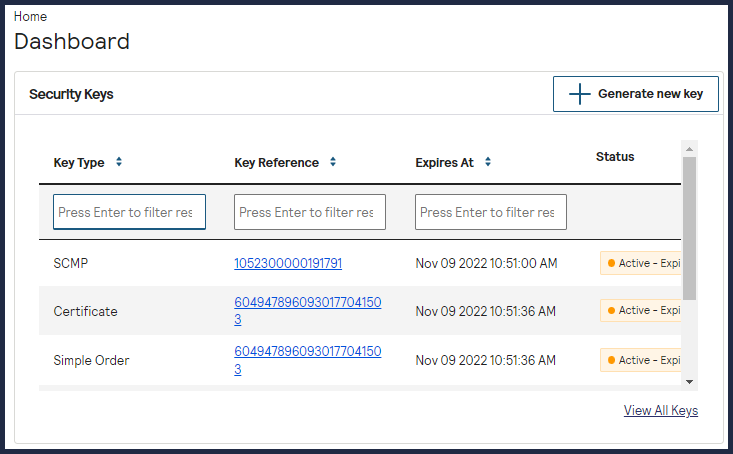
Key Management
When you log in to 
the
, navigate to
Business Center
Payment Configuration > Key Management
to access the Key Management page. You can use the Key Management page to:
- Search for an existing key.
- Delete an existing key.
- Create a new key by clickingGenerate new key.
- View any keys that will expire soon.
Batch Upload Keys
A
batch upload key
is P12 certificate that enables you to securely send batch
files to Cybersource
. This key is required if you are using Offline
Transaction File Submission, also known as programmatic batch upload. For more information about Offline Transaction File Submissions and how to use
this key to enable it, see the
Offline Transaction File
Submission Implementation Guide
.This section describes how to create a new batch upload key or submit an existing P12
certificate to use as your batch upload key.
Create a Batch Upload Key
Follow these steps to create a batch upload key:
- Log in to theBusiness Center:
ADDITIONAL INFORMATION
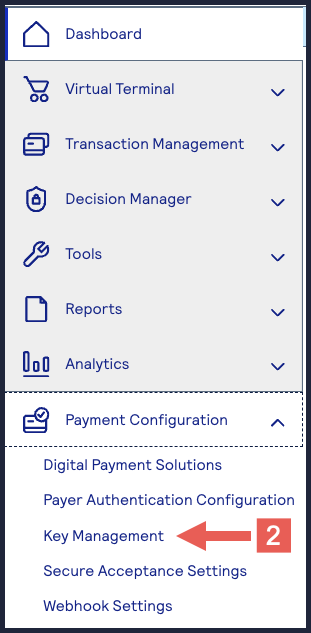
- On the left navigation panel, choose
Payment Configuration > Key Management.
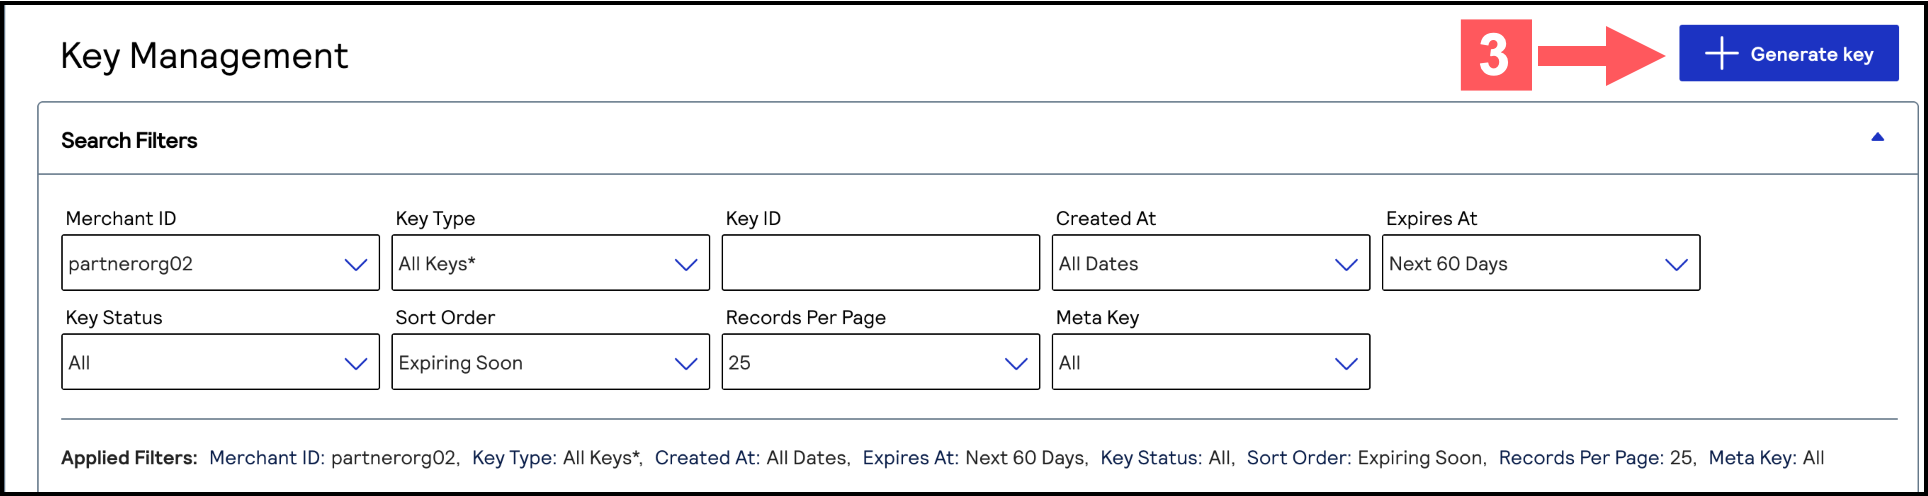
- Click+ Generate keyon the Key Management page.
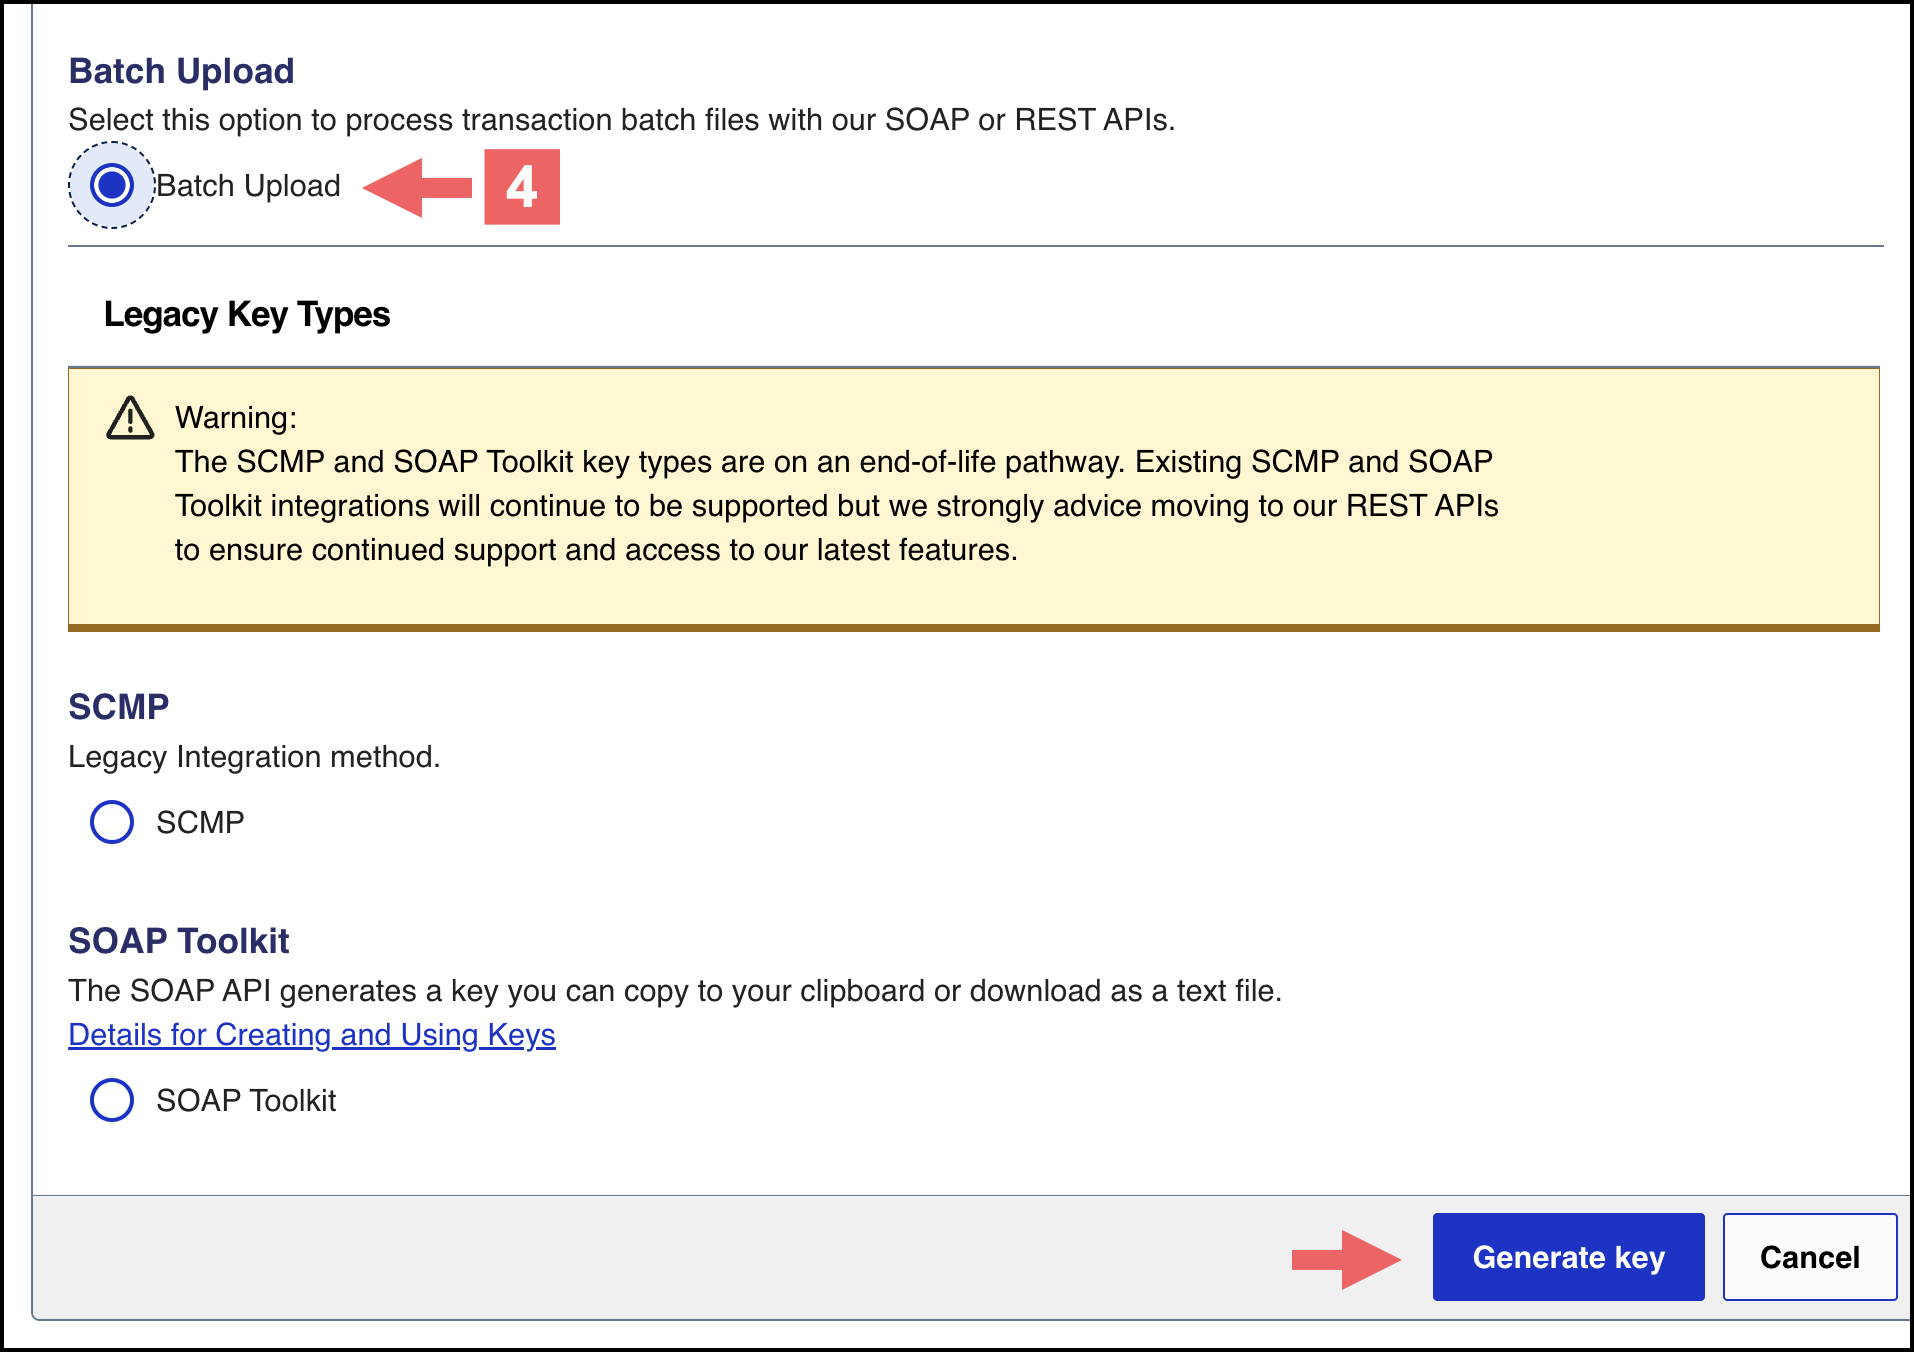
- Under Batch Upload, chooseBatch Upload, and then clickGenerate key.If you are using aportfolioaccount, the Key options window appears, giving you the choice to create a meta key.For more information about how to create a meta key, see .
- Choose from one of these two options:
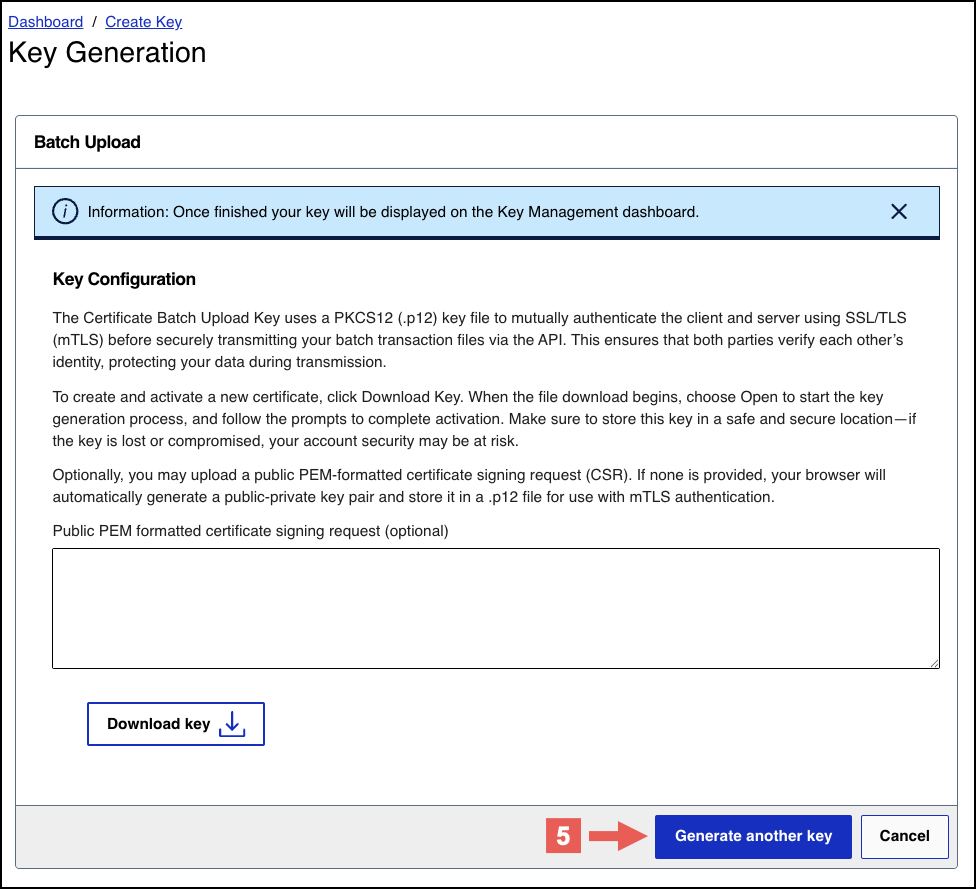
- If you are a creating a new Batch Upload key, clickDownload key
 .
.
- If you are submitting your own certificate, enter your public PEM-formatted certificate in the text box, then clickDownload key
.
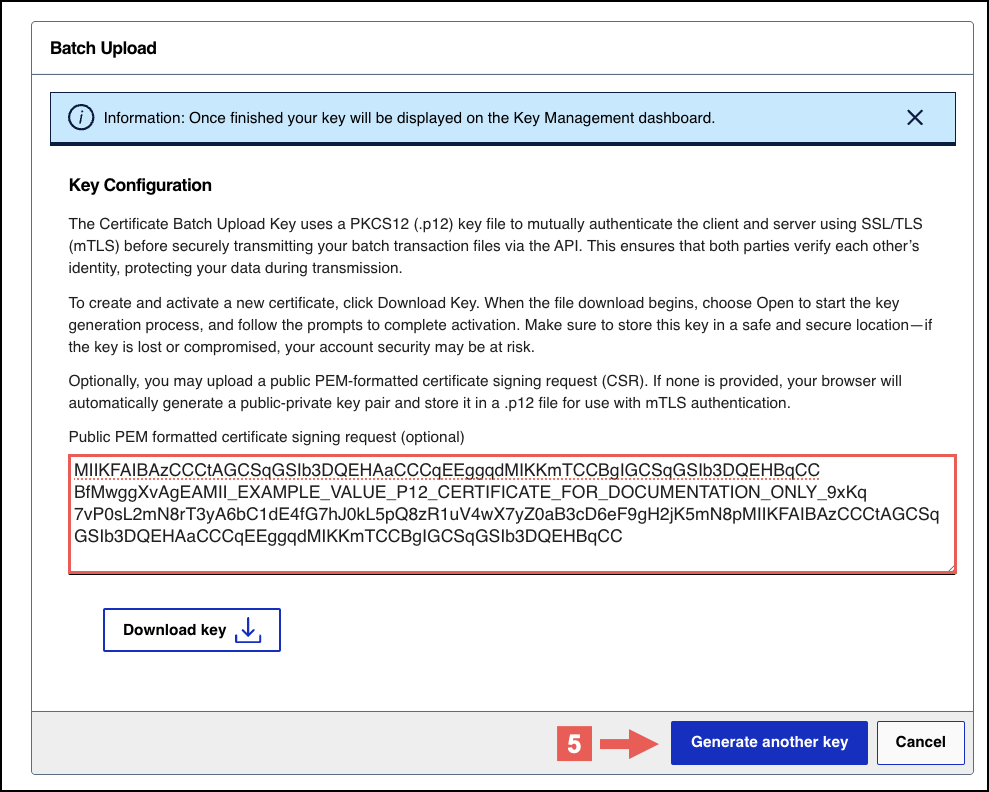
- Create a password for the certificate by entering one into theNew PasswordandConfirm Passwordfields. ClickGenerate key.
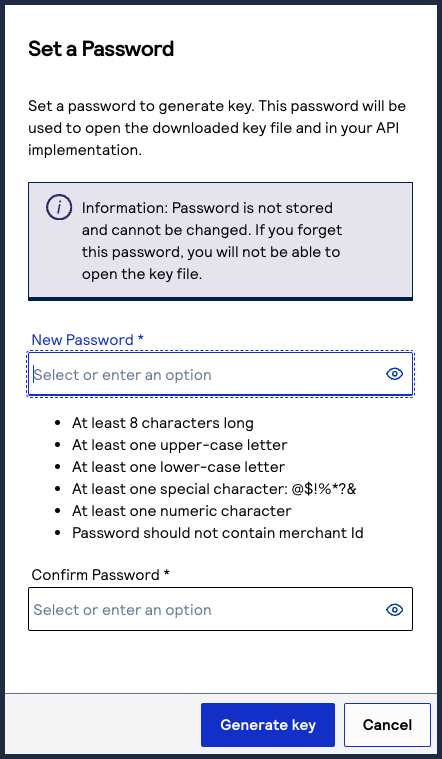 The.p12file downloads to your desktop.If prompted by your system, approve the location to which the key downloads.
AFTER COMPLETING THE TASK
To create or submit another key, click
Generate another key
. To
view all of your created keys, go to the Key Management page.IMPORTANT
Securely store the
.p12
file and password in your system. Do not share
the key credentials with anyone outside of your administrative team or
organization. PGP Keys
Cybersource
uses Pretty Good Privacy (PGP) encryption for Account Updater
response files and Notice of Change (NOC) reports.For information about Account Updater, see the
Account Updater User Guide
. For
information about NOC reports, see Electronic Check Services Developer
Guide
.A PGP public/private key pair enables you to use encryption to protect payment data. You exchange
the public part of this key pair with
Cybersource
, which uses the public key to encrypt response files
or NOC reports. You use the private part of the key pair to decrypt the response files or NOC reports.
Only the private key can decrypt files that are encrypted with the public key.Key information:
- PGP keys expire after 3 years.
- Security keys can be used to make any request, including payments. Treat your security keys as you would any secure password.
- You must use separate keys for the test and production environments.
Creating PGP Keys
You can use any OpenPGP-compliant software to generate Pretty Good Privacy (PGP) keys. The key
that you generate must be an RSA key. These free OpenPGP solutions are available:
Cybersource
recommends that you follow these guidelines:- Make the key at least 2048 bits long.
- Store the private key in an encrypted format to protect it from unauthorized use.
- Back up the private key in case of disaster.
Place the backup of the private key on removable media, and lock it in
secure storage.
Cybersource
does not receive a
copy of your private key and cannot decrypt files that are encrypted with your public
key. After you create a public/private key pair, add the public key to the Business Center
as described in the next section.Adding a PGP Key to Your Account
Follow these steps to add a PGP key to your account:
- Log in to theBusiness Center:
- On the left navigation panel, choose
Payment Configuration > Key Management.
- Click+ Generate key.
The Create Key page appears.
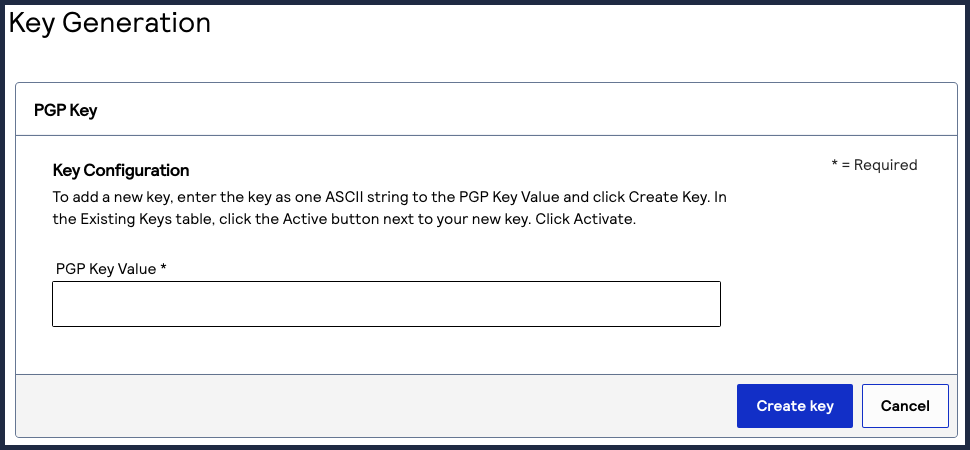
- SelectPGPand clickGenerate key.

- Enter the ASCII string into the text field, and clickCreate key.
Granting User Permissions
A user account requires certain permissions in order to work with PGP keys and the
Account Updater request files and reports. Follow these steps to grant user
permissions:
- Log in to theBusiness Center.
- On the left navigation panel, navigate to
 Account Management > Roles.
 - Choose the role that needs to work with PGP keys and click the
 edit
button.The Edit User Role page appears.
edit
button.The Edit User Role page appears. - Choose from these permissions:
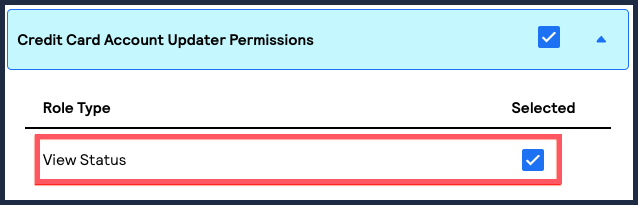
- Under Credit Card Account Updater Permissions, chooseView Status.This option enables the user to view the status of uploaded Account Updater request files and NOC reports.
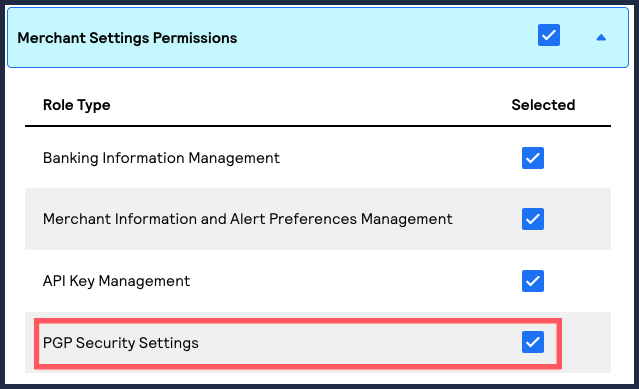
- Under Merchant Settings Permissions, choosePGP Security Settings.This option gives the user permission to upload, activate, and deactivate encryption keys.
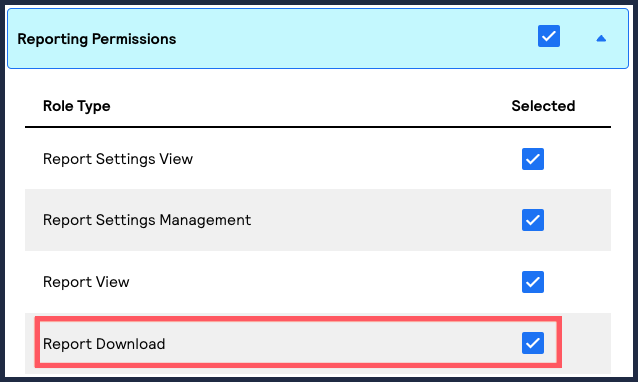
- Under Reporting Permissions, chooseReport Download.This option gives the user permission to download Account Updater response files and NOC reports.
- ClickSavewhen done.
REST API Keys
REST API keys are used to enable secure communication between you and
Cybersource
when using the REST API.The REST API supports these two types of security keys:
- P12 Certificatesfor using JSON Web Token authentication.
- Shared secret key pairfor using HTTP signature authentication.
You can create these keys using the
Business Center
or submit your own public
PEM-formatted certificate to use as your security key. IMPORTANT
REST API keys expire after 3 years.
Security keys can be used to make any request, including payments. Treat your security
keys as you would any secure password.
You must use separate keys for the test and production
environments.
When you sign up for a Sandbox account, your confirmation email
contains a shared secret key pair.
Create a P12 Certificate
Follow these steps to create a P12 certificate file if you are using JSON Web Tokens to
secure communication:
- Log in to theBusiness Center:
- On the left navigation panel, choose
Payment Configuration > Key Management.
- Click+ Generate keyon the Key Management page.
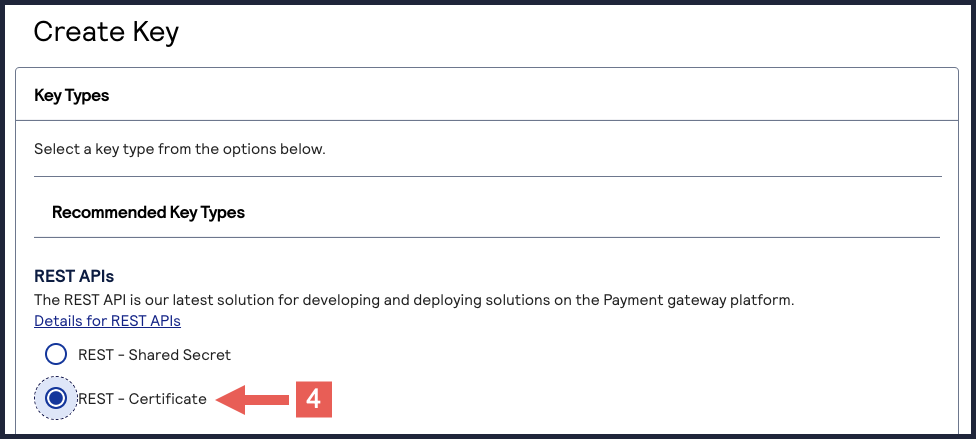
- Under REST APIs, chooseREST – Certificate, and then clickGenerate key.The Key Generation page appears.If you are using aportfolioaccount, the Key options window appears, giving you the choice to create a meta key.For more information about how to create a meta key, see .
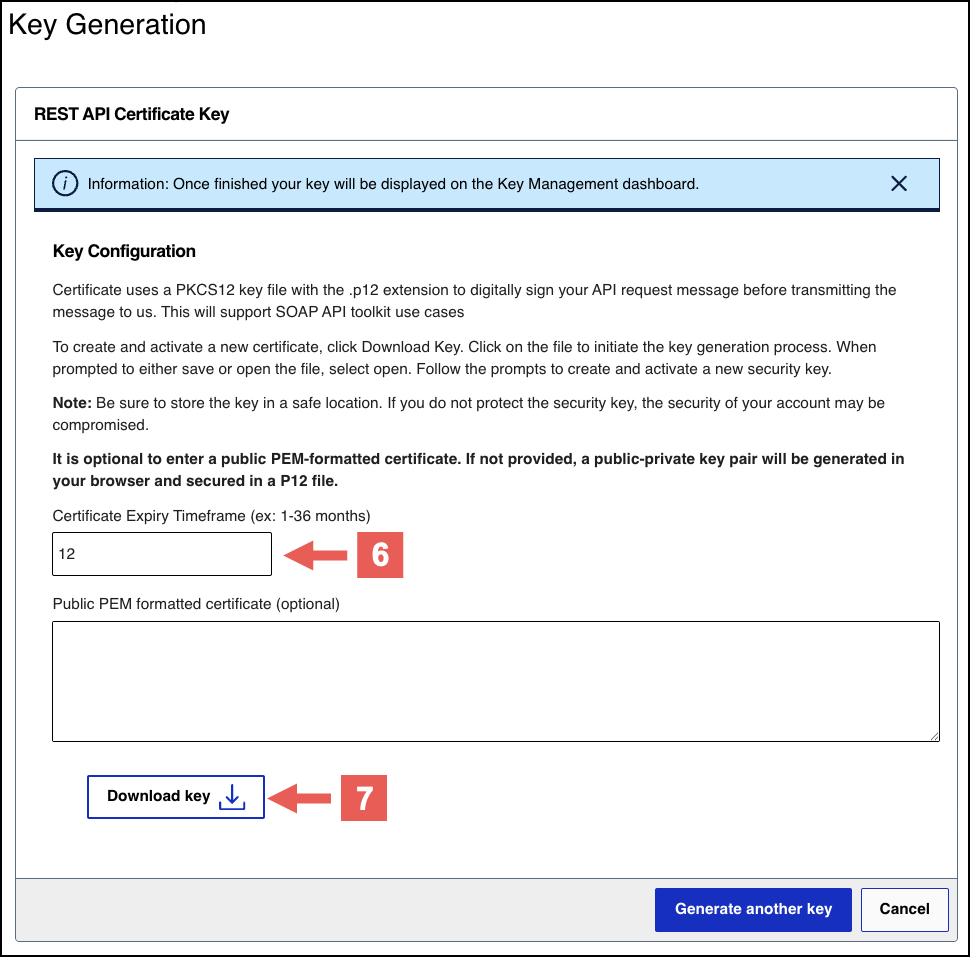
- (Optional) You can set the Certificate Expiry Timeframe field to the number of months you want the key to remain active before it expires. Only whole numbers from 1–36 are accepted. By default, new keys expire after 12 months.
- ClickDownload key
.
- Create a password for the certificate by entering one into theNew PasswordandConfirm Passwordfields. ClickGenerate key.
The.p12file downloads to your desktop.If prompted by your system, approve the location to which the key downloads.
To create or upload another key, click
Generate another key
. To view
all of your created keys, go to the Key Management page.IMPORTANT
Securely store the
.p12
file and password in your system.
These credentials are required in order to implement certain products, and you must
be able to access them.Submit a Certificate Signing Request
Follow these steps to submit your own public PEM-formatted certificate signing request (CSR).
- Log in to theBusiness Center:
- On the left navigation panel, choose
Payment Configuration > Key Management.
- Click+ Generate keyon the Key Management page.
- Under REST APIs, chooseREST – Certificate, and then clickGenerate key.The Key Generation page appears.If you are using aportfolioaccount, the Key options window appears, giving you the choice to create a meta key.For more information about how to create a meta key, see .
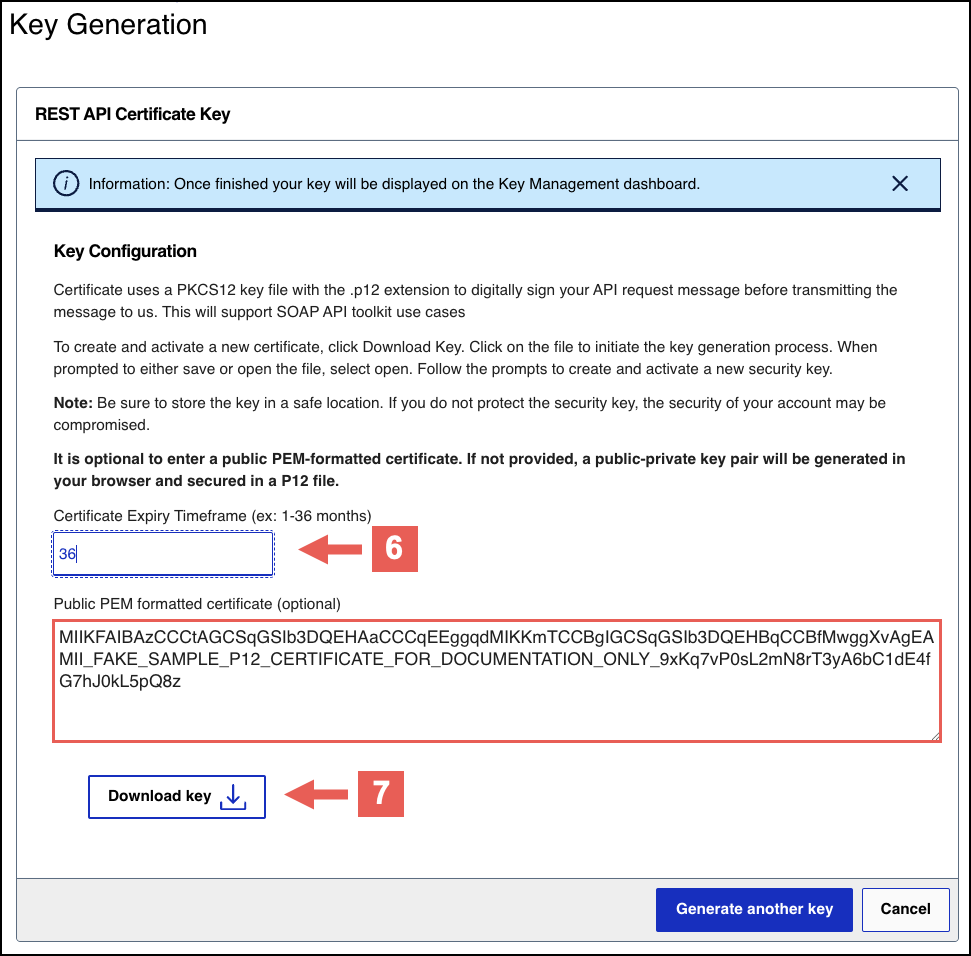
- (Optional) You can set the Certificate Expiry Timeframe field to the number of months you want the key to remain active before it expires. Only whole numbers from 1–36 are accepted. By default, new keys expire after 12 months.
- Enter your public PEM-formatted certificate in the text box, then clickDownload key
.If you need to generate your own CSR and private key, run this command. In this example,merchantis your organization or merchant ID (MID). You can extract the certificate value by opening theexample.csrfile using a text editor application.openssl req -new -newkey rsa:2048 -keyout private_key.pem -out example.csr -sha256 -nodes -subj "/CN=merchant"
- (Optional) To convert your submitted CSR into a.p12file, run this command. In this example,merchantis your organization or merchant ID (MID).You can use the P12 certificate for testing using theREST API Referenceon the Developer Center.openssl pkcs12 -export -name "$(printf 'serialnumber=%s,cn=%s' "$(openssl x509 -inmerchant_certChain.pem -noout -serial | cut -d= -f2 | xxd -r -p)" "$(openssl x509 -inmerchant_certChain.pem -noout -subject | sed -n 's/.*CN=\([^/]*\).*/\1/p')" )" -outmerchant.p12 -inkey private_key.pem -inmerchant_certChain.pem
- When prompted, set a password for the.p12file.
To create or upload another key, click
Generate another key
. To view
all of your created keys, go to the Key Management page.IMPORTANT
Securely store the
.p12
file and password in your system.
These credentials are required in order to implement certain products, and you must
be able to access them.Create a Shared Secret Key
Follow these steps to create a shared secret key pair:
- Log in to theBusiness Center:
- On the left navigation panel, choose
Payment Configuration > Key Management.
- Click+ Generate keyon the Key Management page.
REST—API Response MLE Key
This section describes how to create, submit, and test a REST—API response MLE key.
Message-Level Encryption (MLE) enables you to store information or communicate
with other parties while helping to prevent uninvolved parties from understanding the
stored information. Enabling MLE requires you to create or submit a
P12
Certificate
for encrypting your requests and a REST – API Response MLE
key for decrypting received responses. If your organization is using meta keys, the
P12 Certificate
and REST – API Response MLE
must be created by the
same portfolio or merchant account.Additional Information
For information about how to implement MLE in your system, see the Enable Message-Level
Encryption section in the
Getting Started with REST
Developer
Guide.Create or Submit a REST—API Response MLE Key
Before you can enable your system to support MLE, you must create or upload
a
REST—API response MLE
certificate. After creating or uploading the certificate,
you can extract the certificate's key to begin enabling MLE. If your organization is
using meta keys, the P12 certificate
and REST – API response MLE
key must
be created by the same portfolio or merchant account.Follow these steps to create or submit an API Response MLE certificate in
the
Business Center
:- Log in to theBusiness Center:
- On the left navigation panel, choose
Payment Configuration > Key Management.
- Click+ Generate keyon the Key Management page.
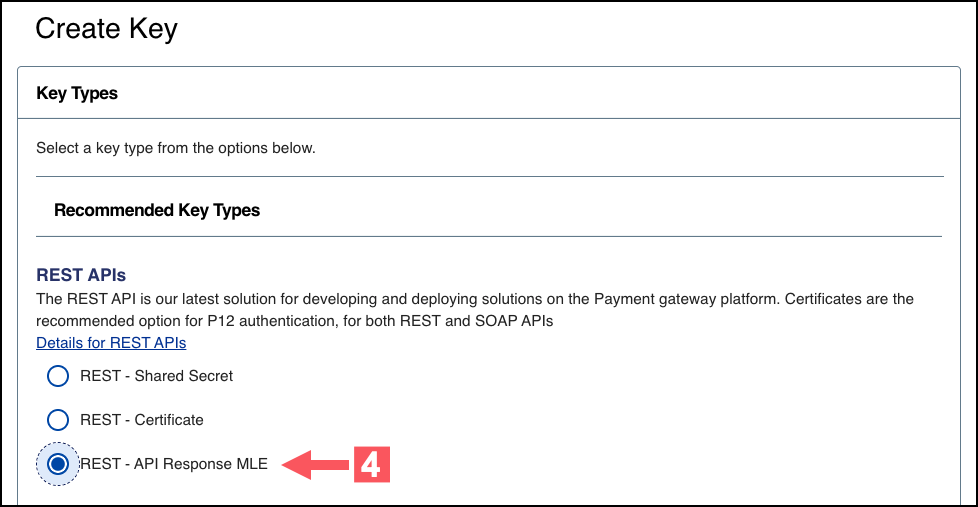
- Under REST APIs, chooseREST – API Response MLE, and then clickGenerate key.
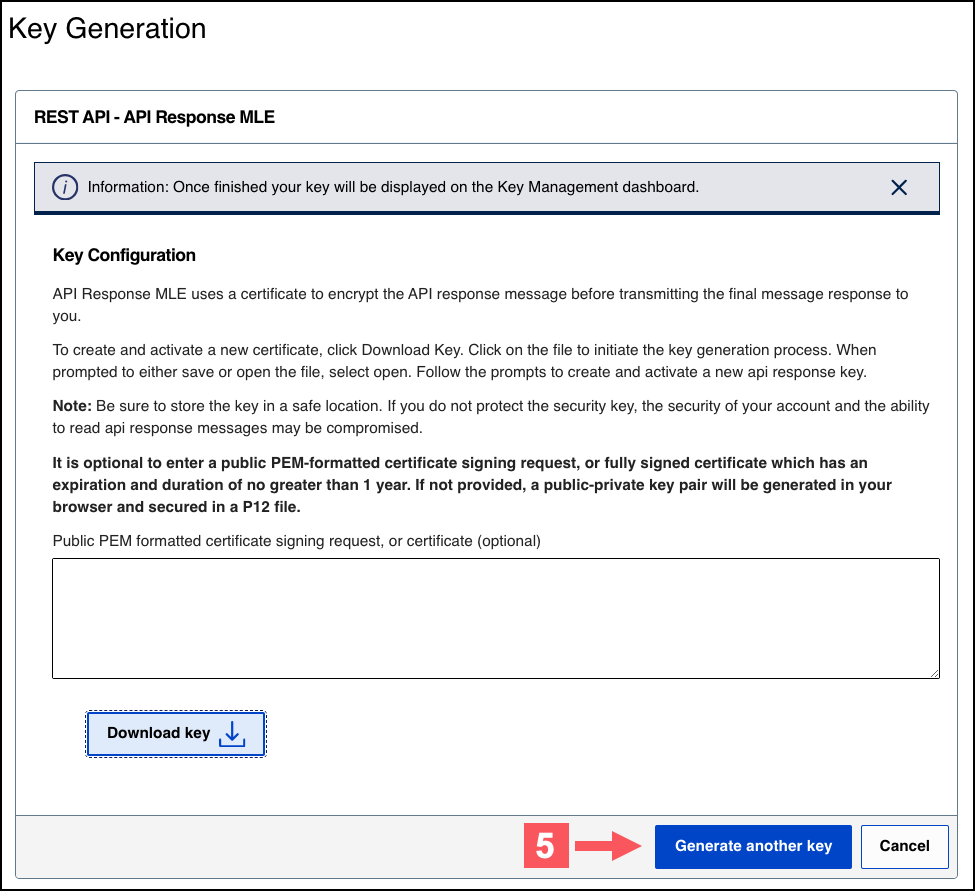
- Choose one of these options to download your key:
- To create a new API response MLE certificate, clickDownload key
.
- To upload your own certificate, enter your public PEM-formatted certificate in the text box, and then clickDownload key
. The
.pemfile downloads to your desktop. If prompted by your system, approve the location to which the file downloads.
- If you are creating a certificate, the Set a Password window appears. Create a password for the certificate by entering the password into theNew PasswordandConfirm Passwordfields, and then clickGenerate key.The.p12file downloads to your desktop. If prompted by your system, approve the location to which the key downloads.
To create or submit another key, clickGenerate another key. To view all of your created keys, go to the Key Management page.IMPORTANTSecurely store the.p12file and password in your system. These credentials are required in order to implement certain products, and you must be able to access them.
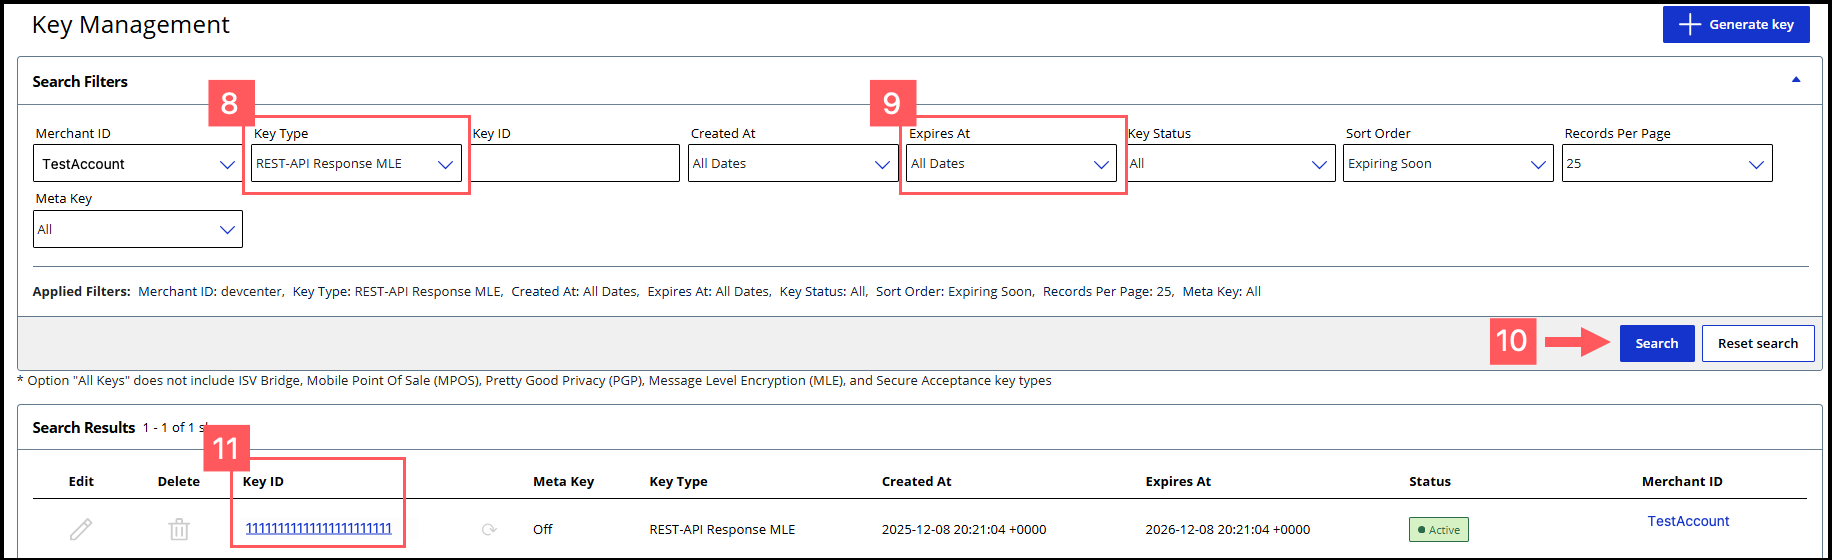
- ClickCancel.The Key Management page appears.
- Click theKey Typefilter and chooseREST-API Response MLE.
- Click theExpires Atfilter and chooseAll Dates.
- ClickSearch.
- Find the REST–API Response key that you created in the Search Results table and save its key ID.The key ID is needed to test and configure your system to use MLE.
- Test Your REST–API Response MLE Key
- To test your REST–API Response key, see Test Your API Response MLE Key.
Test Your API Response MLE Key
Follow these steps to verify that your API response MLE key is working. If you
have not already created or submitted an API response MLE certificate, see the Create or
Submit a REST—API Response MLE Key section in Enable Message-Level Encryption.
- Go to the REST API Reference page in theCybersourceDeveloper Center:
- On the left navigation panel, choose an API that supports MLE. For testing purposes, you can chooseIntelligent Commerce > Intelligent Commerce Product > Enroll a Card.MLE support is indicated byRequest MLEandResponse MLEat the top of the screen.

- Choose theMLE Configurationtab.
- Enter your API response MLE key credentials in the Message Level Encryption Credentials section:
- Response encryption:Enter the key ID of your API response MLE key.This is the key ID that you saved in Step 10 in Step 4A: Create or Submit a REST—API Response MLE Key.
- Response decryption:ClickBrowseto submit your own decryption private key from your local system. Only.p12files are supported.
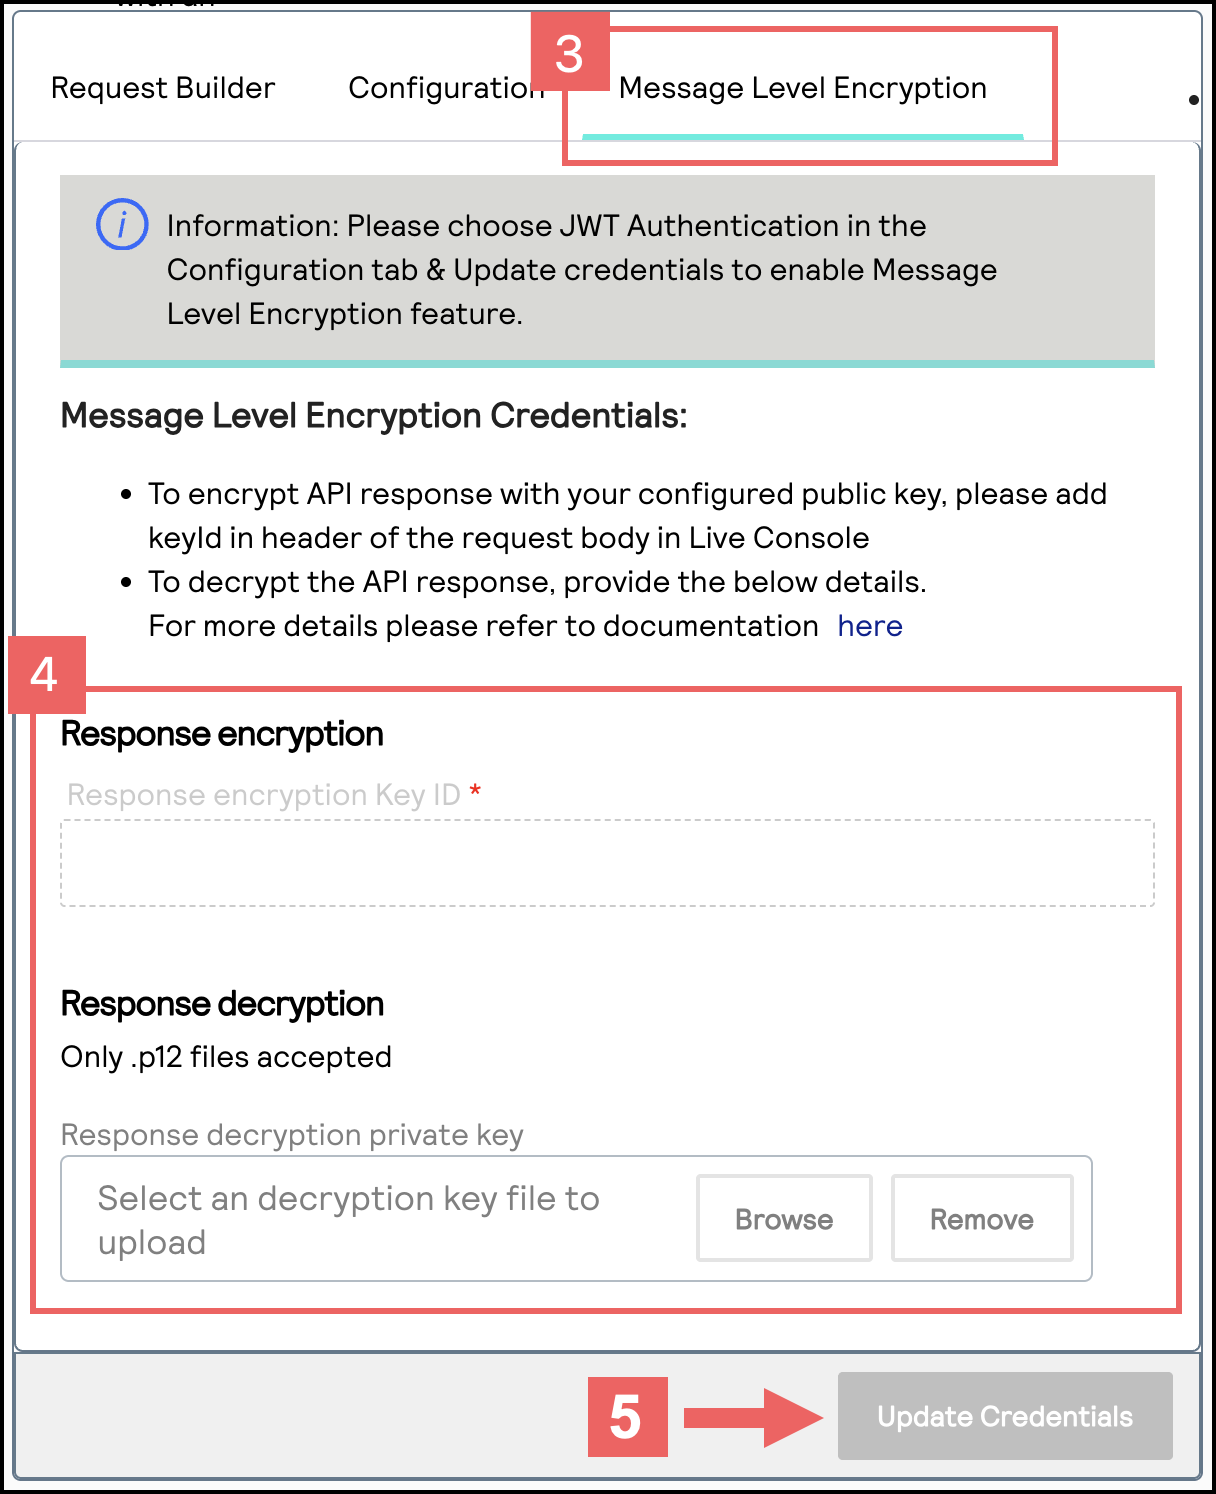
- ClickUpdate Credentials.
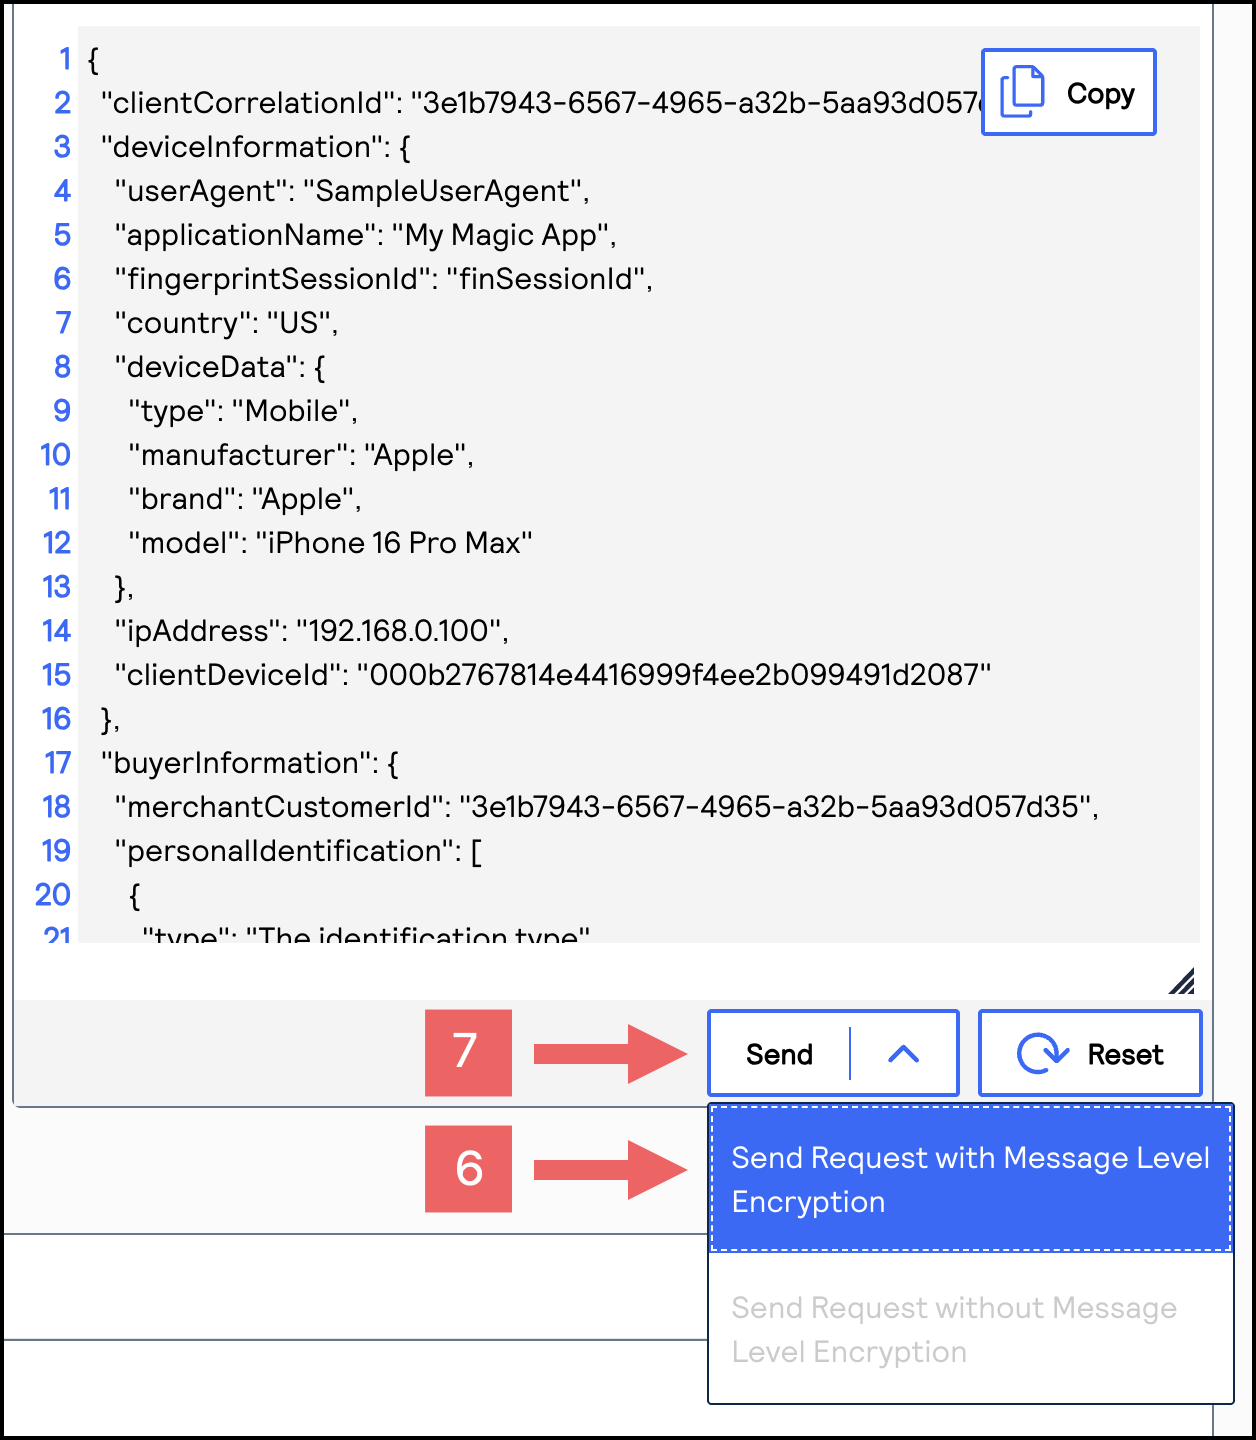
- From theSenddrop-down menu, chooseSend Request with Message Level Encryption.
- ClickSend.
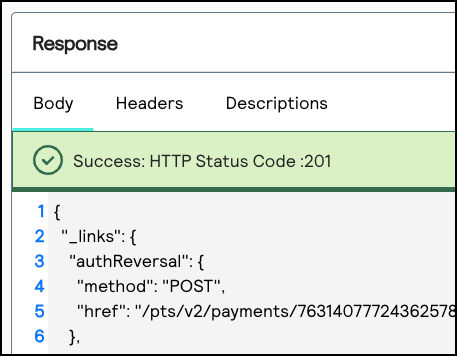
- If aSuccess: HTTP Status Code: 201message displays in the Response section, your REST—API response MLE key is verified as properly configured.
Secure Acceptance Key
Secure Acceptance API keys are used to enable secure communication between you, the merchant,
and
Cybersource
when using the Secure Acceptance features and APIs. Key information:
- Secure Acceptance keys expire after 2 years.
- Security keys can be used to make any request, including payments. Treat your security keys as you would any secure password.
- You must use separate keys for the test and production environments.
Creating a Secure Acceptance Key
Follow these steps to create a Secure Acceptance key:
- Log in to theBusiness Center:
- On the left navigation panel, choose
Payment Configuration > Key Management.
- Click+ Generate key.
The Create Key page appears.
- SelectSecure Acceptanceand clickGenerate Key.The Key Generation page appears.
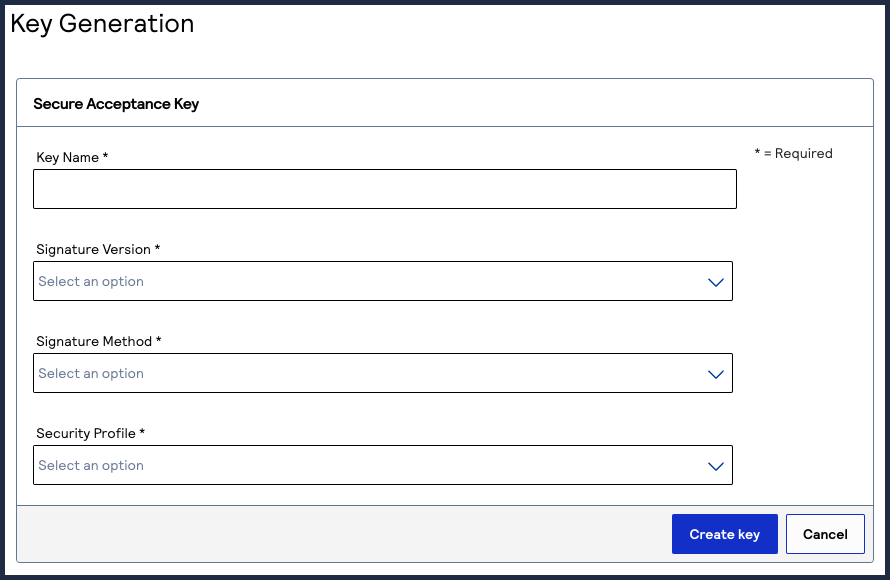
- Enter the required information in these fields:
- Key Name: enter a name for this key.
- Signature Version: select1from the drop-down menu.
- Signature Method: selectHMAC-SHA256from the drop-down menu.
- Security Profile: select a security profile from the drop-down menu.
- ClickGenerate Keywhen done.
The Key Generation page appears.
- To obtain the access key and secret key, either:
- Copy the keys to your clipboard by clicking the
 copy
button.
copy
button. - Download a text file containing both keys by clickingDownload key
.
Simple Order API Keys
Simple Order API keys are used to enable secure communication between the merchant and
your
Cybersource
when using Simple Order APIs.Key information:
- Simple Order API keys expire after 3 years.
- Security keys can be used to make any request, including payments. Treat your security keys as you would any secure password.
- You must use separate keys for the test and production environments.
Creating a Simple Order API Key
Follow these steps to create a Simple Order API key:
- Log in to theBusiness Center:
- On the left navigation panel, choose
Payment Configuration > Key Management.
- Click+ Generate key.
The Create Key page appears.
- SelectSimple Order APIand clickGenerate Key.

- ClickDownload keyto download the .p12 file.
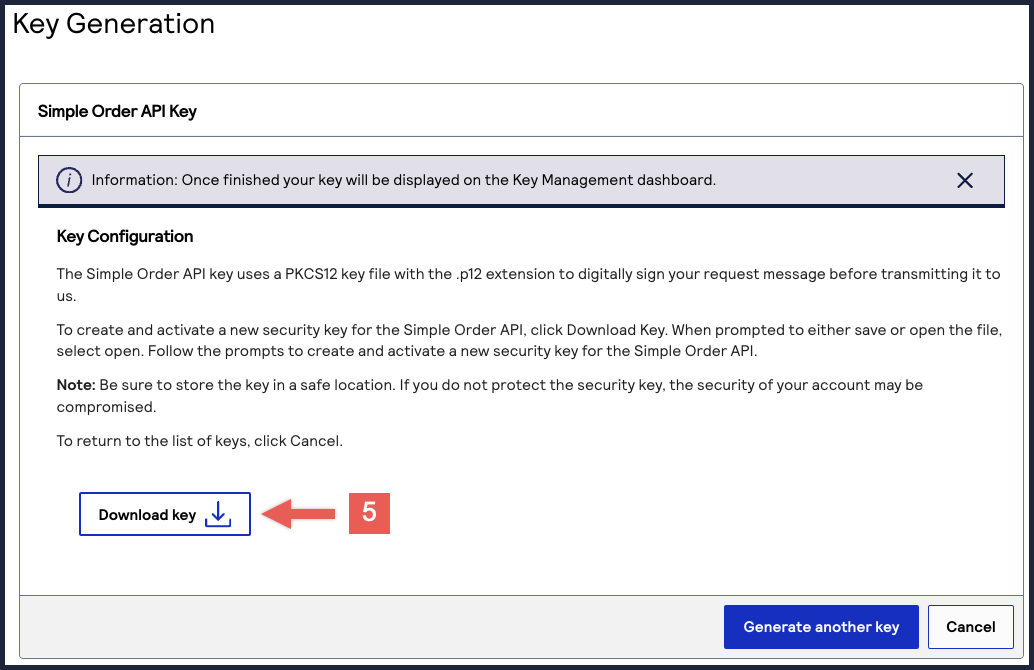 TheSet Passwordpage appears.
 - Enter your new password and confirm it.
- ClickGenerate Keywhen done.
- The .p12 file that contains your Simple Order API key downloads to your desktop.IMPORTANTStore your .p12 file in a secure location with restricted access.
SOAP Toolkit Keys
WARNING
Cybersource
will no longer support SOAP toolkit keys by these dates:- Test environment:July 16, 2025
- Production environment:August 13, 2025
If you are integrating to the Simple Order API, you can use the compliant
certificate-based
Simple Order key
. For more information, see Simple Order API Keys.If your payment
system currently uses the SOAP toolkit key, you can transition your payment
system to use the certificate-based Simple Order API key. For more information
about how to transition your payment system to use the compliant Simple Order
API keys for authentication, see the
P12 Authentication for SOAP Toolkit Key
Users Migration Guide
. Your API requests to Cybersource
will be rejected if you do not implement P12
authentication by the above dates.SOAP toolkit keys are used to enable secure communication between the merchant and
Cybersource
when using the SOAP toolkit.Key information:
- SOAP Toolkit keys expire after 3 years.
- Security keys can be used to make any request, including payments. Treat your security keys as you would any secure password.
- You must use separate keys for the test and production environments.
Creating a SOAP Toolkit Key
Follow these steps to create a SOAP Toolkit key:
- Log in to theBusiness Center:
- On the left navigation panel, choose
Payment Configuration > Key Management.
- Click+ Generate key.
The Create Key page appears.
- SelectSOAP Toolkitand clickGenerate Key.
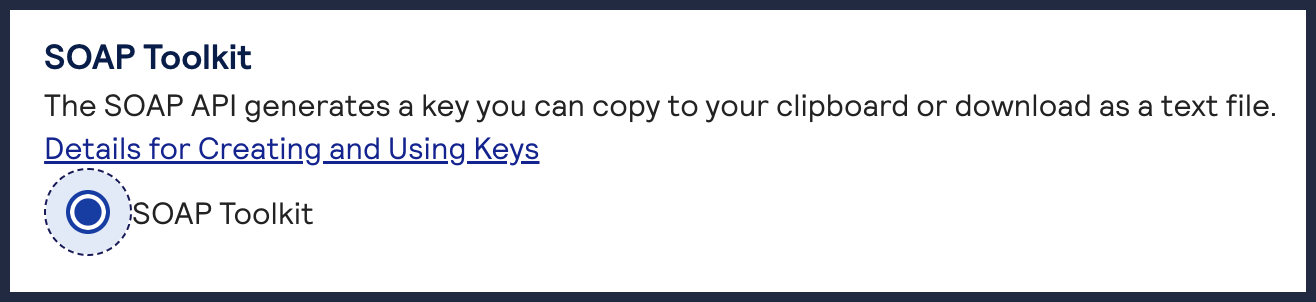 The Key Generation page appears.
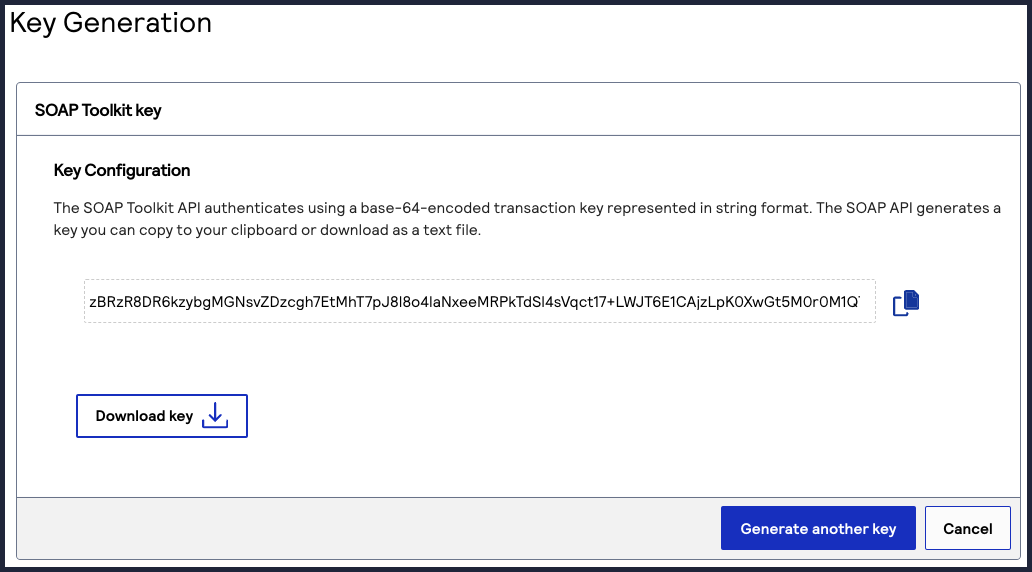
 - To obtain the SOAP Toolkit Key, either:
- Copy the generated key to your clipboard by clicking the
clipboard button.
- Download the generated key to your desktop by clickingDownload key
.
Token Management MLE Keys
Token Management Message-Level Encryption (MLE) keys are required to send
Token Management Service
(TMS
) related requests that use encryption. To create an
Token Management MLE key, go to the Business Center
.Key information:
- Message-level encryption keys expire after 3 years.
- Security keys can be used to make any request, including payments. Treat your security keys as you would any secure password.
- You must use separate keys for the test and production environments.
Creating a Token Management MLE Key
Follow these steps to create a token management message-level encryption key:
- Log in to theBusiness Center:
- On the left navigation panel, choose
Payment Configuration > Key Management.
- Click+ Generate key.
The Create Key page appears.
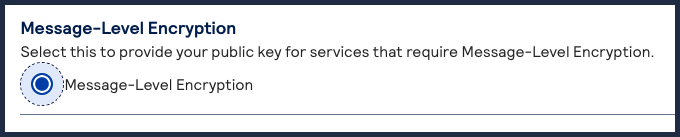
- SelectMessage-Level Encryptionand clickGenerate Key.
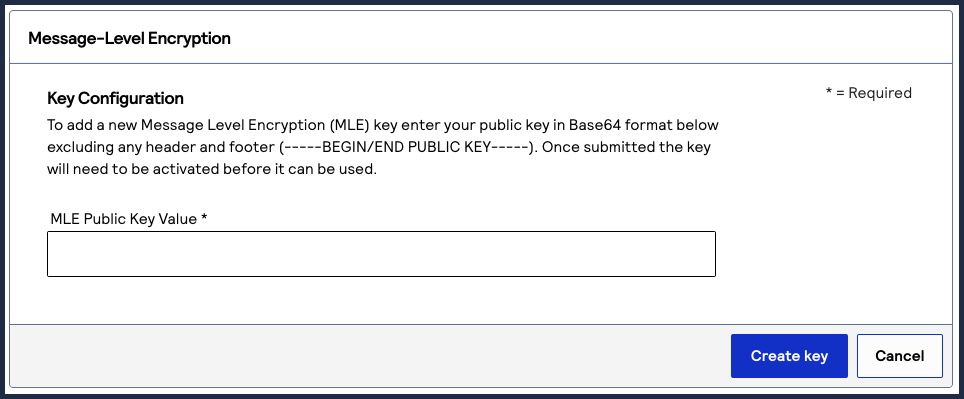
- Enter the public key value into the text field, and clickCreate Key.
Manage a Security Key
This section describes how to manage your security keys using the
Business Center
, such
as searching for keys and deleting keys.In the
Business Center
, you can use the Business Center
dashboard or key
management to manage your keys.Business Center Dashboard
Business Center
DashboardWhen you log in to
the
, the dashboard
appears. You can use the Security Keys dashboard to: Business Center
- View any keys that will expire soon.
- Go directly to the Key Management page by clickingView All Keys.
- Create a new key by clickingGenerate new key.
Figure:
Business Center
Dashboard
Key Management
When you log in to
the
, navigate to
Business Center
Payment Configuration > Key Management
to access the Key Management page. You can use the Key Management page to:
- Search for an existing key.
- Delete an existing key.
- Create a new key by clickingGenerate new key.
- View any keys that will expire soon.
Deactivate a Key
You can deactivate these key types when you no longer need to use them:
- PGP keys
- Message-level encryption (MLE) keys
- Secure Acceptancekeys
Keys automatically deactivate when they reach the expiration date.
Follow these steps to deactivate security keys:
- On the left navigation panel, navigate to
.Payment Configuration> Key ManagementThe Key Management page appears.
- Find the key in the table of keys, or search for one using the search filters. Then click the link for that key in the Keys column.The Key Information page appears.
- Click the
 Deactivatebutton.
 - ClickYes.
Delete a Key
You can delete a key when you no longer need to use it for payment processing.
Keys become inactive when they reach the expiration date.
Follow these steps to delete a security key:
- On the left navigation panel, navigate to
.Payment Configuration> Key ManagementThe Key Management page appears.
- In the table of keys, find the key that you want to delete and click the
 delete row
button in the row for that key.The Delete Confirmation window displays.
delete row
button in the row for that key.The Delete Confirmation window displays.
- ClickDelete.The key is deleted.

Search and Export Keys Using Filters
Key Management enables you to search for keys using filters, which set parameters that
determine the keys in the search results. Follow these steps to search for keys using
filters:
- On the left navigation panel, choose
.Payment Configuration> Key Management
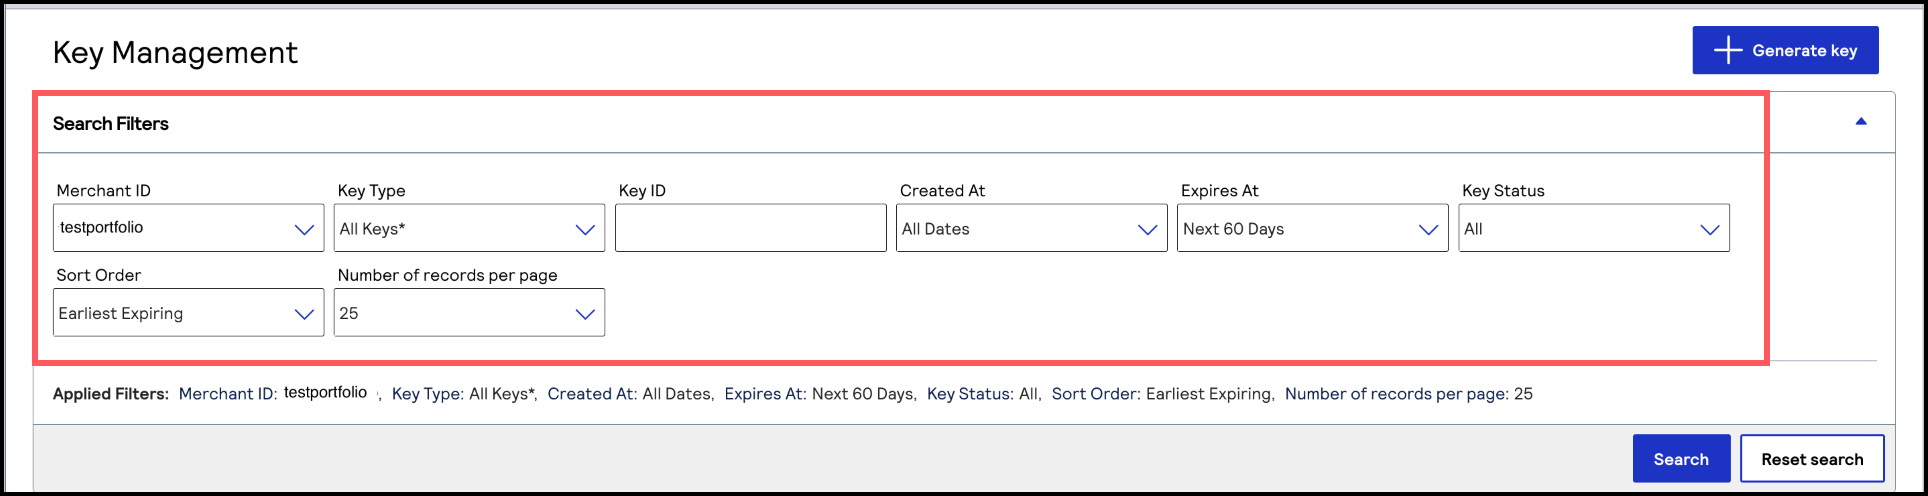
- Under Search Filters, use these drop-down menus to set the parameters of your search:Search FiltersSearch FiltersFilter DescriptionsCreated AtChoose a date range to search for keys that were created within that range. The default value is all dates.To search by a specific date, clickCustom Dateand then set these fields:
- Start Date
- End Date
Expires InChoose a date range to search for keys that are expiring within that date range. The default value displays keys expiring within the next 60 days.To search by a specific date, clickCustom Dateand then set these fields:- Start Date
- End Date
Key IDEnter a key ID to search for a key by its ID.Key StatusChoose to search by the key status:- Active:Search for active keys.
- Inactive:Search for inactive keys.
- All (default):Search for both active or inactive keys.
Key TypeChoose a key type to search for keys based on its key type.IMPORTANTThe default key type ofAlldoes not include these key types, which must be chosen individually to retrieve in a search:- ISV Bridge
- Message Level Encryption (MLE)
- Mobile Points of Sale (MPOS)
- Pretty Good Privacy (PGP)
- Secure Acceptance
Merchant (portfolio account and merchant account users only)Choose a transacting merchant in your organization. This search filter is only available if you are using a portfolio account or merchant account. The default value is the organization ID that you are using to access theBusiness Center.You can also chooseAll Merchantsto display all keys that belong to your organization ID and all keys that belong to the transacting merchants in your organization.Number of Records Per PageChoose the number of keys that will display in each results page from these options:- 25 (default)
- 50
- 100
Sort OrderChoose an order in which the key results will display from these options:- Created Newest:List keys in order by creation date, beginning with the most recent.
- Created Oldest:List keys in order by creation date, beginning with the oldest key.
- Expiring Last:List keys in order by expiration date, beginning with the key that has the earliest expiration date.
- Expiring Soon (default):List keys in order by expiration date, beginning with the key that has the last expiration date.
TIPTo see all keys, use these filter settings:- Key Type
- Set toAll Keys.
- Created At
- Set toAll Dates.
- Expires At
- Set toAll Dates.
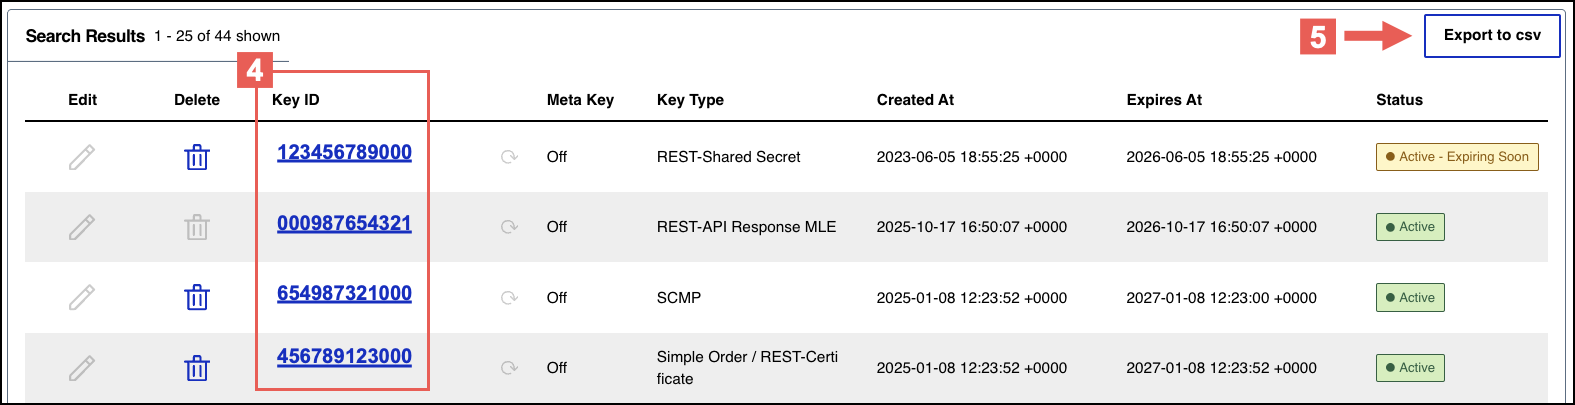
- ClickSearch.The Search Results section displays a table with your key results.You can reset the search filters to their default settings by clickingReset Search.
- To view key details, find a key in the search results table and click the Key ID hyperlink in the Key ID column.The Key Detail page appears.
- To export your key search results, clickExport to csv.The CSV-formatted file downloads to your desktop. If prompted by your system, approve the location to which the file downloads.
Meta Key Set Up
A meta key is a specialized API key that a portfolio or merchant account user can create for
the purposes of processing transactions on behalf of multiple of their transacting MID
accounts. Meta keys are useful for organizations whose transacting MID users do not
manage or store their own individual API keys. Instead of having to create and assign a
unique API key for each of your transacting MIDs, you can create and assign a single
meta key to dozens or hundreds of your transacting MIDs simultaneously.
IMPORTANT
Transacting MIDs cannot generate meta keys. For security reasons, do not
give a meta key to your transacting MID users.
Meta keys are available for these APIs:
- REST
- Simple Order API
- SOAP
- SCMP
When you are logged in to a portfolio account or merchant account in the
Business Center
, you can assign a meta key to a static subset of transacting MIDs or to all current
and future transacting MIDs. If you choose to assign a meta key to only a subset of
transacting MIDs, you can reassign the key later to all current and future transacting
MIDs. When using a meta key, the portfolio account or merchant account user submits a transaction on
behalf of the transacting MID. These processed transactions are recognized as belonging
to the transacting MID. Searching for or reporting on the transactions are performed at
the transacting MID level. All three account types can process follow-on transactions to
the initial transaction, such as a capture or refund.
Access to creating and managing meta keys is automatically enabled for all organizations. You
can disable the meta key feature to not allow portfolio or merchant account users to
generate meta keys or process transactions using meta keys.
WARNING
When a meta key expires, it expires for all transacting MIDs to which
it is assigned. All transactions using that meta key will fail. Careful monitoring is
necessary to track meta key expiration dates. You must create and assign a new key
before the previous key expires. The length of time after which a key expires depends on
the API for which the key was created. Read the instructions for the API key you will
use.
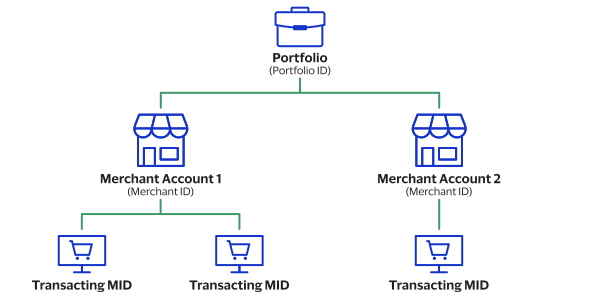
Hierarchy of Meta Keys
In this diagram, if the portfolio user assigns a meta key to all of the transacting MIDs,
every transacting MID in the diagram is assigned the key. If one of the merchant
accounts assigns a meta key to all of the transacting MIDs, only the transacting
MIDs belonging to that merchant account are assigned the key. The portfolio or
merchant account user can also choose specific transacting MIDs to assign the meta
key to.
Figure:
Portfolio Hierarchy Example
Create a Meta Key as a Portfolio User
This section describes how to create a meta key as a portfolio user in the
Business Center
. IMPORTANT
If you would like to create meta keys using the API,
contact your support team for more
information.
Follow these steps to create a meta key:
- Log in to theBusiness Center:
- On the left navigation panel, choose
Payment Configuration > Key Management.
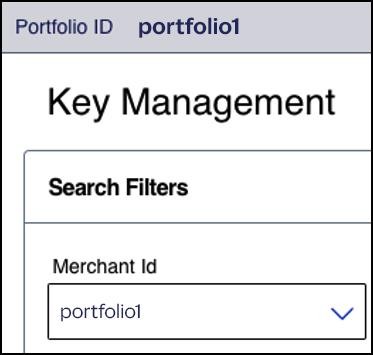
- In theMerchant Idfield, choose your portfolio ID if it is not already chosen by default.
- Click+ Generate key.
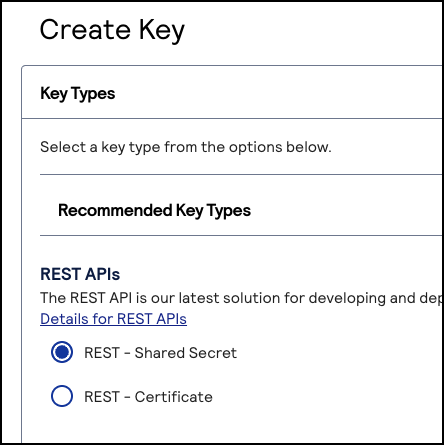
The Create Key page appears.
- Choose a key type and clickGenerate Key.
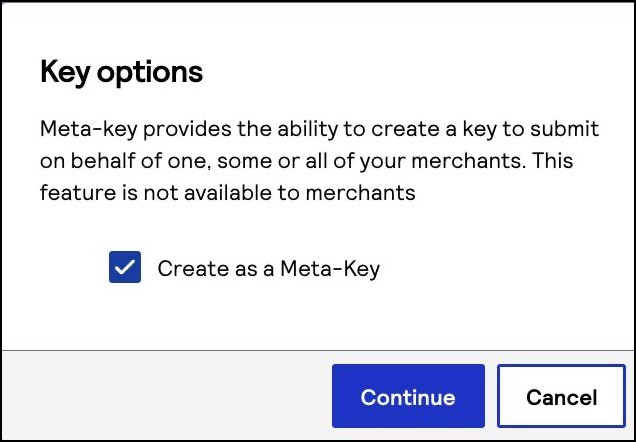
 The Key options page appears.
 - Check theCreate as a Meta-Keybox and clickContinue.
- Choose one of these options to assign the key:
- To assign this key to all accounts in the current portfolio, chooseAll current and future Merchant IDs, clickCreate key, and continue to the Create Key page. All future merchant IDs will be automatically assigned this key. You are done and do not need to proceed with the following steps.
- To assign this key to a specific merchant or group of merchants, chooseCustom Merchant ID selectionand then clickCreate key. This key is not automatically assigned to any future merchants. Proceed to the following steps.
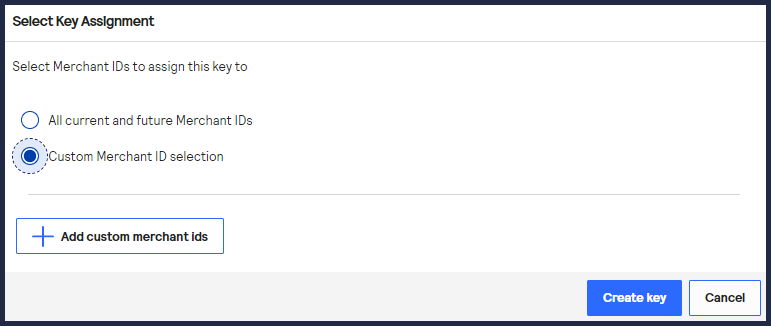
- Click+ Add custom merchant ids. The Add Custom Merchant IDs page appears.By default, all merchant IDs are shown in the Merchant IDs table. To limit the list to a subset of merchant IDs, click+ Add filter, choose a search filter from the drop-down menu, and clickSearch.
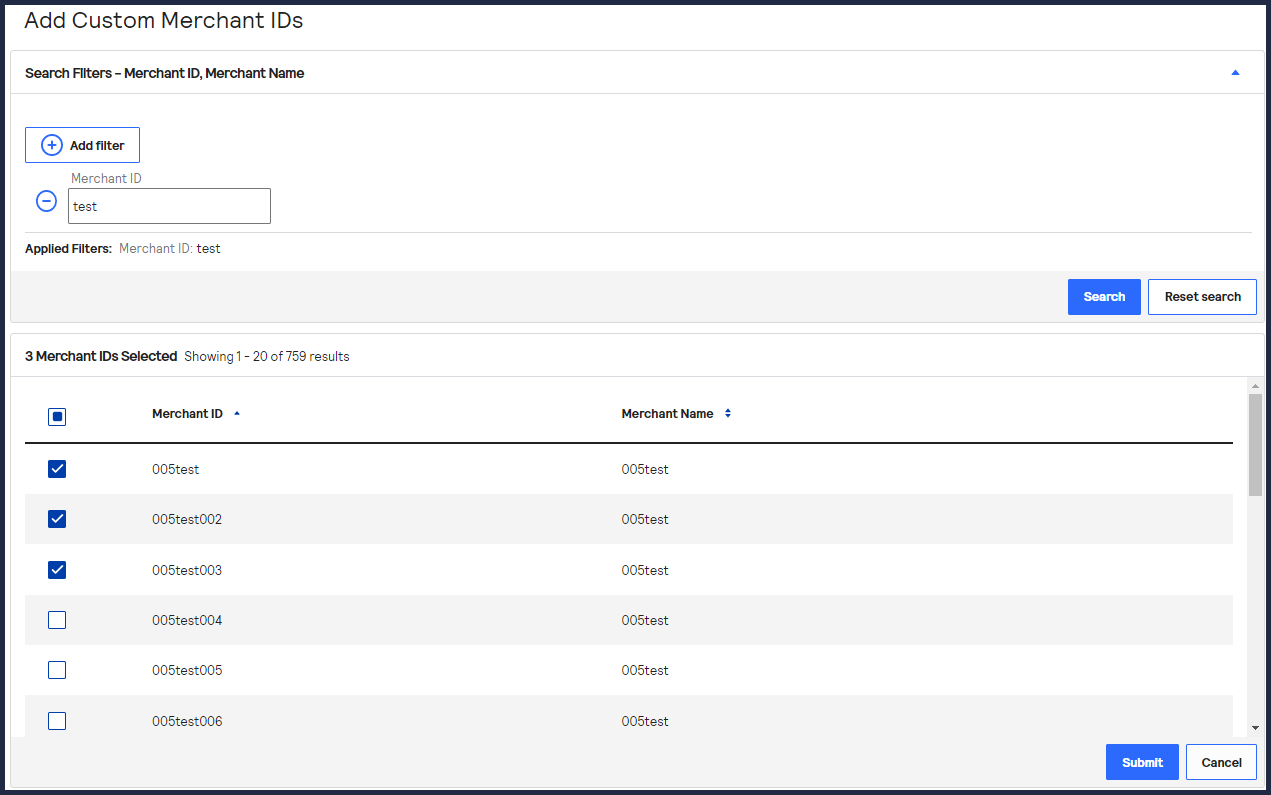
- Check the boxes of one or more transacting MID accounts, and clickSubmit.The Key Generation page opens.IMPORTANTAn error message displays if you choose a merchant account that has a meta key already assigned to it. Before you can assign a new meta key, remove the currently assigned meta key from the merchant account. For more information, see Remove a Meta Key from all Merchants and Remove a Meta Key from Select Merchants.
- ClickCreate key.Continue to the Create Key page to view your new key.You can also generate a new key by clicking+ Generate Keyagain.
Create a Meta Key as a Merchant Account User
This section describes how to create a meta key as a merchant account user in the
Business Center
. IMPORTANT
If you would like to create meta keys using the API,
contact your support team for more
information.
Follow these steps to create a meta key:
- Log in to theBusiness Center:
- On the left navigation panel, choose
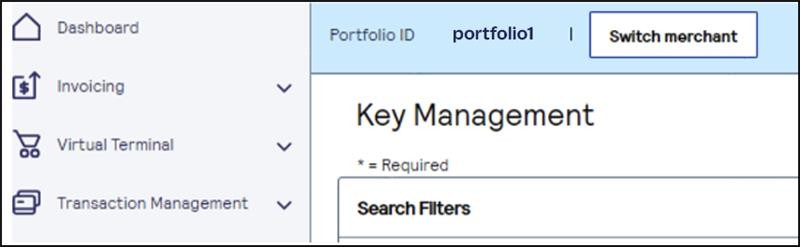
Payment Configuration > Key Management.If you are using a portfolio account to create a meta key for one of your merchant accounts, you can switch to a merchant account by clickingSwitch merchant.
 The Quick Merchant Switch page appears.Choose the merchant account ID that you want to switch to, and clickSwitch.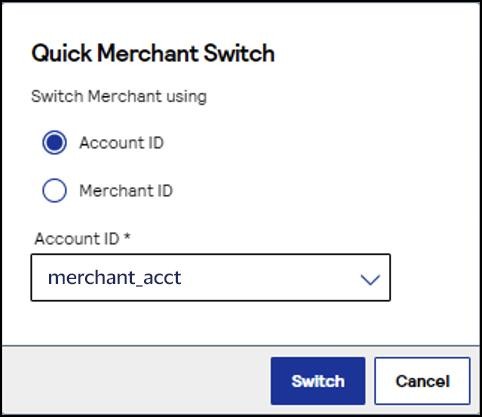
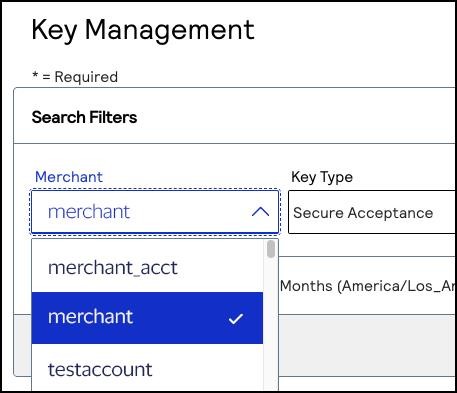
- In theMerchant IDsearch filter, choose your merchant account ID.If you logged in from a portfolio user account or the account (_acct) level, verify that the merchant ID you choose does not contain_acctin the ID name.
- Click+ Generate key.
The Create Key page appears.
- Choose a key type and clickGenerate Key.
The Key options page appears.
- Check theCreate as a Meta-Keybox and clickContinue.
- Choose one of these options to assign the key:
- To assign this key to all accounts in the current portfolio, chooseAll current and future Merchant IDs, clickCreate key, and continue to the Create Key page. All future merchant IDs will be automatically assigned this key. You are done and do not need to proceed with the following steps.
- To assign this key to a specific merchant or group of merchants, chooseCustom Merchant ID selectionand then clickCreate key. This key is not automatically assigned to any future merchants. Proceed to the following steps.
- Click+ Add custom merchant ids. The Add Custom Merchant IDs page appears.By default, all merchant IDs are shown in the Merchant IDs table. To limit the list to a subset of merchant IDs, click+ Add filter, choose a search filter from the drop-down menu, and clickSearch.
- Check the boxes of one or more transacting MID accounts, and clickSubmit.The Key Generation page opens.IMPORTANTAn error message displays if you choose a merchant account that has a meta key already assigned to it. Before you can assign a new meta key, remove the currently assigned meta key from the merchant account. For more information, see Remove a Meta Key from all Merchants and Remove a Meta Key from Select Merchants.
- ClickCreate key.Continue to the Create Key page to view your new key.You can also generate a new key by clicking+ Generate Keyagain.
Assign a Meta Key to All Merchants
Follow these steps to assign an existing meta key to all current MIDs and automatically assign
it to all future MIDs.
- On the left navigation panel of theBusiness Center, choose
Payment Configuration > Key Management.
- Find the key that you want to assign or revoke by searching and filtering.
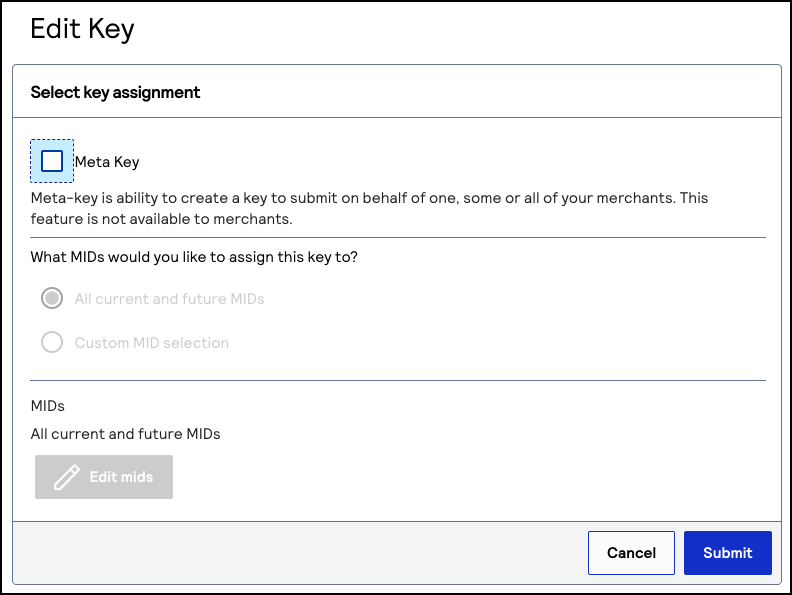
- In the Edit Key column, click the
edit
button.The Edit Key page appears.
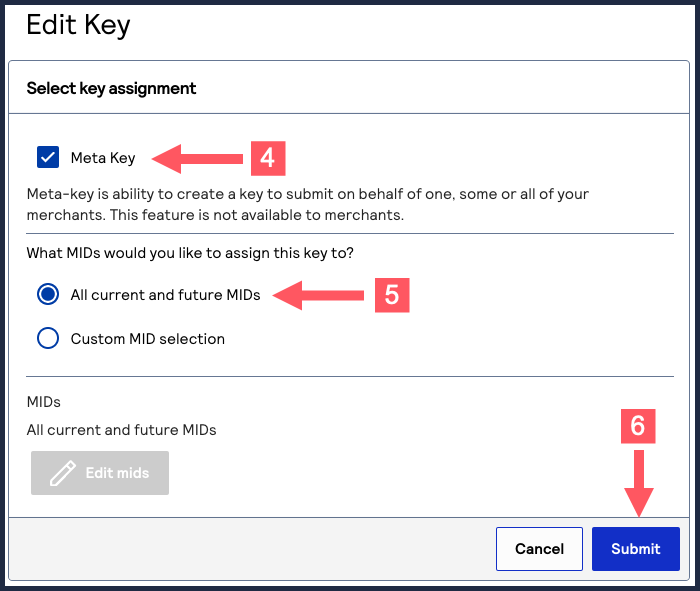
- Check theMeta Keycheck box if it is not already.
- SelectAll current and future MIDsif it is not already.
- ClickSubmitwhen done.
 IMPORTANTAn error message displays if you choose a merchant account that has a meta key already assigned to it. Before you can assign a new meta key, remove the currently assigned meta key from the merchant account. For more information, see Remove a Meta Key from all Merchants and Remove a Meta Key from Select Merchants.
Assign a Meta Key to Select Merchants
Follow these steps to assign an existing meta key to a custom selection of MIDs.
- On the left navigation panel of theBusiness Center, choose
Payment Configuration > Key Management.
- Find the key that you want to assign by searching and filtering.
- In the Edit Key column, click the
edit
button.The Edit Key page appears.
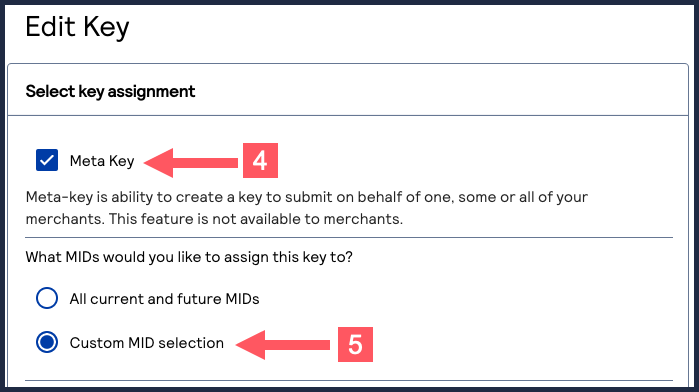
- Check theMeta Keycheck box if it is not already.
- SelectCustom MID selectionif it is not already.
- Click+ Add custom merchant ids.
- Select the MIDs that you want to assign the meta key to.To filter MIDs, click+ Add filter, select a filter, and clickSearch. ClickSave.
- ClickSubmitwhen done.The Key Generation page appears.IMPORTANTAn error message displays if you choose a merchant account that has a meta key already assigned to it. Before you can assign a new meta key, remove the currently assigned meta key from the merchant account. For more information, see Remove a Meta Key from all Merchants and Remove a Meta Key from Select Merchants.
- ClickCreate keyto complete assigning the key.
Remove a Meta Key from all Merchants
Follow these steps to remove a meta key from all of the transacting MIDs that it is
assigned to. This action also changes the meta key into a regular API key.
IMPORTANT
Removing a meta key does not delete the key. To delete a meta
key, see Delete a Meta Key.
- On the left navigation panel of theBusiness Center, choose
Payment Configuration > Key Management.
- Find the key that you want to assign or revoke by searching and filtering.
- In the Edit Key column, click the
edit
button.The Edit Key page appears.
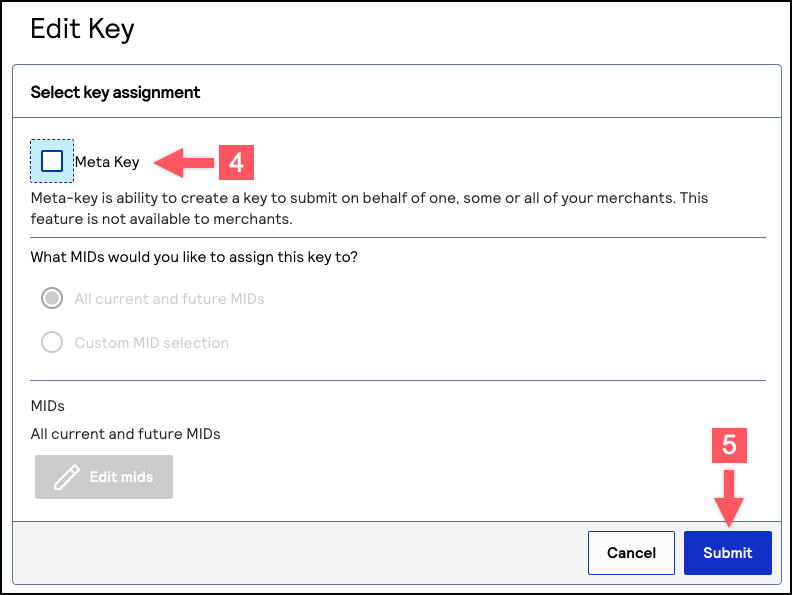
- Uncheck theMeta Keycheckbox.
- ClickSubmitwhen done.
Remove a Meta Key from Select Merchants
Follow these steps to remove a meta key from specific transacting MIDs that it is
assigned to.
IMPORTANT
Removing a meta key does not delete the key. To delete a meta
key, see Delete a Meta Key.
- On the left navigation panel of theBusiness Center, choose
Payment Configuration > Key Management.
- Find the key that you want to remove by searching and filtering.
- In the Edit Key column, click the
edit
button.The Edit Key page appears.
- Verify that theMeta Keycheck box is checked.
- Verify thatCustom MID selectionis selected.
- Click+ Add custom merchant ids.
- Select the MIDs that you want to remove the meta key from.To filter MIDs, click+ Add filter, select a filter, and clickSearch. ClickSave.
- ClickSubmitwhen done.The Key Generation page appears.IMPORTANTAn error message displays if you choose a merchant account that has a meta key already assigned to it. Before you can assign a new meta key, remove the currently assigned meta key from the merchant account. For more information, see Remove a Meta Key from all Merchants and Remove a Meta Key from Select Merchants.
Convert a Meta Key or Non-Meta Key
Follow these steps to add or remove the meta key functionality to an existing API
key.
If you remove meta key functionality from an API key, all MIDs assigned to that key
will no longer be able to process transactions using that meta key.
- On the left navigation panel of theBusiness Center, choose
Payment Configuration > Key Management.
- Find the key that you want to assign or revoke by searching and filtering.
- In the Edit Key column, click the
edit
button.The Edit Key page appears.
- Choose one of these options:
- Toaddmeta key functionality to the API key, check theMeta Keycheck box.
- Toremovemeta key functionality from the API key, uncheck theMeta Keycheck box.
- ClickSubmitwhen done.
Delete a Meta Key
You can delete a key when you no longer need to use it for payment processing.
Keys become inactive when they reach the expiration date.
Follow these steps to delete a security key:
- On the left navigation panel, navigate to
.Payment Configuration> Key ManagementThe Key Management page appears.
- In the table of keys, find the key that you want to delete and click the
delete row
button in the row for that key.The Delete Confirmation window displays.
- ClickDelete.The key is deleted.
Regenerate a Meta Key
When any security key expires, it must be updated. If you update the meta key manually, you
must reassign merchants to it, which can be time-consuming. Meta key regeneration
enables you to update the meta key with all of its assignments intact, streamlining
the process.
- On the left navigation panel, choose
Payment Configuration > Key Management.The Key Management page appears.
- Use the Search Filters to find the key you want to regenerate.Results appear in the Search Results table.
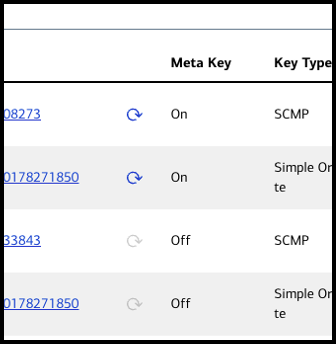
- Click theRegenerate meta keybutton for the key you want to regenerate.The Key Generation page opens. The new key appears on the screen. The original key remains active until its original expiration date.
- Provide the new key details to the merchants associated with the affected MIDs, and instruct them to update the information wherever it is used.
Meta Keys in API Requests
This section describes how to include meta keys in API requests.
REST API Payment Request with a Meta Key
REST API meta keys can use either HTTP signature or JSON Web Token methods of
authentication.
If you use the SDK, see the sample code for how to configure your meta key in GitHub:
If you do not use the SDK, see the following information.
HTTP Signature
When creating the signature, use the portfolio or account ID as the value for the
v-c_merchant-id
header. However, when sending the API
request, use the transacting merchant ID (MID) as the value for the
v-c-merchant-id
header.Signature Headers
v-c-merchant-id : merchantId
Key id : 266438gb-2120-4q36-8da7-fbb9a196d452
Shared Key : mgWWJVV2aGQyEPwufdhhe/GiFUhsNIwYvWMih4FMCN9E=
Request Target : post /pts/v2/payments
Host : api.cybersource.com
JSON Web Token
The portfolio or account ID is not required in the header or the body. Pass the P12
certificate along with the
v-c-merchant-id
header, using the
transacting merchant account ID (MID) as the value.JSON Web Token
// JWT Header
{
"v-c-merchant-id":"MerchantID",
"alg":"RS256",
"x5c":["MIIB2jCCAUOgAwlBAgIWNDg...=="]
}
// JWT Claimset
{
"digest":"0qjow45/L/m6DIHd8K90rL+tBKufR1RuyE4QG7whZQ=",
"digestAlgorithm":"SHA-256",
"iat":"1594249865"
}
// JWT Signature
{
data=base64urlEncode(JWT header)+"."+base64urlEncode(Claimset) signature=RS256Hash(data,private_key);
Simple Order API Payment Request Using a Meta Key
In this Simple Order API payload, the
merchantID
field value is the
transacting merchant ID (MID) on whose behalf this transaction is being sent from the
portfolio or merchant account. The portfolio or merchant account user will use a Simple Order
API meta-key certificate to digitally sign the request message before sending it to Cybersource
. There is no need to declare the portfolio ID or merchant account ID. Simple Order API Payment Request
<requestMessage xmlns="urn:schemas-cybersource-com:transaction-data-1.135">
  <merchantID>merchant12378</merchantID>
  <merchantReferenceCode>NGTS1500</merchantReferenceCode>
  <clientLibrary>Java XML</clientLibrary>
  <clientLibraryVersion>5.0.2</clientLibraryVersion>
  <clientEnvironment>Mac OS X/10.14.5/Oracle Corporation/1.8.0_161</clientEnvironment>
  <invoiceHeader>
    <merchantDescriptor>NGMerchants*MyProduct</merchantDescriptor>
    <merchantDescriptorContact>444-444-4444</merchantDescriptorContact>
  </invoiceHeader>
  <billTo>
    <firstName>TSTester</firstName>
    <lastName>NextGen</lastName>
    <street1>201 S. Division St.</street1>
    <street2>Suite 500</street2>
    <city>Ann Arbor</city>
    <state>MI</state>
    <postalCode>48104-2201</postalCode>
    <country>US</country>
    <phoneNumber>999-999-9999</phoneNumber>
    <email>[email protected]</email>
    <ipAddress>66.185.179.2</ipAddress>
  </billTo>
  <shipTo>
    <firstName>Olivia</firstName>
    <lastName>White</lastName>
    <street1>1295 Charleston Rd</street1>
    <street2>Cube 2386</street2>
    <city>Mountain View</city>
    <state>CA</state>
    <postalCode>94043</postalCode>
    <country>US</country>
    <phoneNumber>650-965-6000</phoneNumber>
  </shipTo>
  <purchaseTotals>
    <currency>usd</currency>
    <grandTotalAmount>2202</grandTotalAmount>
  </purchaseTotals>
  <card>
    <accountNumber>4111111111111111</accountNumber>
    <expirationMonth>12</expirationMonth>
    <expirationYear>2021</expirationYear>
    <cvNumber>111</cvNumber>
    <cardType>001</cardType>
  </card>
  <ccAuthService run="true">
    <commerceIndicator>internet</commerceIndicator>
    <billPayment>true</billPayment>
  </ccAuthService>
  <ccCaptureService run="true"/>
  <businessRules>
    <ignoreAVSResult>true</ignoreAVSResult>
    <ignoreCVResult>true</ignoreCVResult>
  </businessRules>
</requestMessage>
SOAP Payment Request Using a Meta Key
The request envelope requires a SOAP API password generated for the meta key. The value of the
wsse. Username
field is the portfolio or merchant account ID. The value
of the merchantID
field is the transacting MID on whose behalf this
transaction being sent from the portfolio or account. In this example, the request is being sent from a portfolio. The portfolio ID is
portfolioabc
and the transacting MID is merchant12378
.SOAP API Payment Request
<?xml version="1.0" encoding="UTF-8"?>
<SOAP-ENV:Envelope xmlns:SOAP-ENV="http://schemas.xmlsoap.org/soap/envelope/" xmlns:xsd="http://www.w3.org/2001/XMLSchema" xmlns:xsi="http://www.w3.org/2001/XMLSchema-instance">
  <SOAP-ENV:Header>
    <wsse:Security xmlns:wsse="http://docs.oasis-open.org/wss/2004/01/oasis-200401-wss-wssecurity-secext-1.0.xsd" xmlns:wsu="http://docs.oasis-open.org/wss/2004/01/oasis-200401-wss-wssecurity-utility-1.0.xsd">
      <wsse:UsernameToken>
        <wsse:Username>portfolioabc</wsse:Username>
        <wsse:Password Type="http://docs.oasis-open.org/wss/2004/01/oasis-200401-wss-username-token-profile-1.0#PasswordText">8SbCuVZ4FLYakM7Mm+g4jlXgV5kN/uPNfRmpTj8yKNrmvmZU25tFiTyA6Qbx4jakhKYGRDqnma/52WrOu4GQm9WbYp5xyjlE16+YQFJRXY9jQHAmikc18Na3YugZzuBbu1aRcr597pwmdxkoWb87l+6gkqJU04eHayfiMNWSkq8piBcK5fIKIah9eSQdH31DaaqAQHvJJKLL8Ki+7TYJHKc24fBLKY4QPKr0pdGNubqjJxl8YyJXozVv3F4BcmgaklqCVAiORTr/IKTczU6Y56BrPsixsoehBetzqwxnyUjRkS1172fsOFPqPwZSGhMoATyM+EYXTEZoni58q5zvvw==</wsse:Password>
      </wsse:UsernameToken>
    </wsse:Security>
  </SOAP-ENV:Header>
  <SOAP-ENV:Body>
    <requestMessage xmlns="urn:schemas-cybersource-com:transaction-data-1.151">
      <merchantID>merchant12378</merchantID>
      <merchantReferenceCode>BATSNTA1003</merchantReferenceCode>
      <billTo>
        <firstName>James</firstName>
        <lastName>Dough</lastName>
        <street1>600 Morgan Falls Road</street1>
        <street2>Room 2-2123</street2>
        <city>Atlanta</city>
        <state>GA</state>
        <postalCode>30350</postalCode>
        <country>US</country>
        <phoneNumber>650-965-6111</phoneNumber>
        <email>[email protected]</email>
      </billTo>
      <item id="0">
        <unitPrice>1.00</unitPrice>
      </item>
      <item id="1">
        <unitPrice>1.00</unitPrice>
      </item>
      <purchaseTotals>
        <currency>USD</currency>
      </purchaseTotals>
      <card>
        <accountNumber>4111111111111111</accountNumber>
        <expirationMonth>04</expirationMonth>
        <expirationYear>2025</expirationYear>
        <cvNumber>111</cvNumber>
        <cardType>001</cardType>
      </card>
      <ccAuthService run="true"/>
      <ccCaptureService run="true"/>
    </requestMessage>
    <urn:requestMessage xmlns:urn="urn:schemas-cybersource-com:transaction-data-1.151"/>
  </SOAP-ENV:Body>
</SOAP-ENV:Envelope>
SCMP API Payment Request using a Meta Key
In an SCMP API payment request, the
merchant_id
field value is the
transacting MID on whose behalf this transaction being sent from the portfolio or
merchant account. The value of the sender_id
field is the ID of the
portfolio or merchant account. The portfolio or merchant account uses the SCMP API
meta-key certificate to sign and encrypt the request before sending it to Cybersource
. The SCMP API payment request below is sent from a portfolio
account. SCMP API Request
request_id=5580301042523113616883
sender_id=portfolioabc
merchant_id=merchant123
merchant_ref_number=MERCH_SCMP_123
ics_applications=ics_auth
currency=usd
return_auth_record=true
client_lib_version=Oracle Corporation/1.8.0_192/Windows Server 2008 R2/6.1/-/Java/5.2.1/Oracle Corporation/1.8.0_201/Mac OS X/10.14.3/-/Java/5.2.0
offer0=amount:2^offer_id:0^product_name:PName1^merchant_product_sku:testdl^quantity:1^product_code:clothing
ignore_avs=yes
tax_indicator=Y
user_po=LII Test
[email protected]
customer_cc_expmo=10
customer_firstname=Bob
customer_cc_expyr=2020
customer_cc_number=4111111111111111
customer_hostname=bob.bob.com
customer_ipaddress=120.1.1.1
customer_lastname=Dough
customer_phone=555-555-5555
bill_country=US
bill_city=Atlanta
bill_zip=30350
bill_address2=Room 2-2123
bill_address1=123 Test Road
bill_state=GA
[email protected]
ship_to_lastname=Jones
ship_to_country=US
ship_to_county=Monroe
ship_from_city=San Jose
ship_to_city=bloomington
ship_to_co_name=Bob's Excursion Emporium
ship_from_zip=94538
ship_from_state=CA
ship_to_zip=47404
ship_from_country=US
ship_from_county=Santa Clara
ship_to_state=indiana
ship_to_firstname=Cat
ship_to_address2=suite 2-5A
ship_to_address1=37 se main street
Partner Solution Key Set Up
You can process transactions on behalf of merchants who are using your
registered solution. To enable merchants to use your solution, you must create a
partner solution key
. The acquirer you are partnering with must then update
the merchant's account to use the key. Cybersource
also authenticates
the merchants, ensuring that the registered solution only performs actions authorized by
the merchants.This
section explains how you can set up a partner solution key to enable your solutions to
process transactions on behalf of merchants.
- Partner Solution Types
- These are the types of solutions technology partners can register to be used by merchants:
- API-only integrations
- Desktop software
- Hybrid approaches
- Mobile applications
- Plugins
- Terminal integrations
- Web applications
- Benefits
- A partner solution key improves your organization's experience by:
- Reducing the time required to manage API security keys.
- Manage which endpoints a merchant's transactions can use.
- Delegating key management to the Technology Partner.
- Enabling and disabling the web-application from processing transactions.
Overview
This illustration shows an example of how a partner solution key is used across
technology partner and partner reseller organizations.
Figure:
Overview of Partner Solution Key
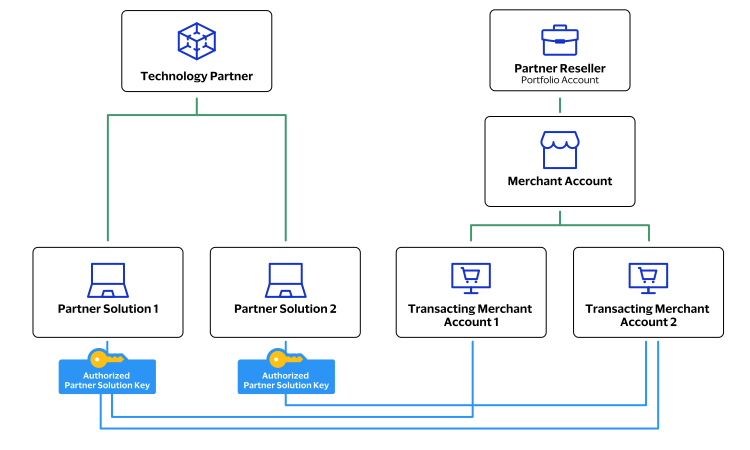
A technology partner can have more than one registered solution that is used by
multiple transacting merchants. Transacting merchants can use multiple solutions
from different technology partners. A technology partner can register a custom
solution that is only usable by a specified partner reseller.
Technology Partner Set Up Tasks
To set up a Partner Solution Key as a technology partner, you must complete the
tasks described in this section.

- Onboard as a technology partner withCybersourceand register your solution.For more information about how to become a partner, see Creating a Tech Partner Sandbox in thePartner Getting Started Guide.
- Contact yourCybersourceaccount manager to create a user account.
- Create a new P12 certificate to use as the Partner Solution Key.For more information, see Create a P12 Certificate.
- Implement the key from your P12 certificate into your system.For more information about how to set up your system to support the P12 certificate, see Construct Messages Using JSON Web Tokens in theGetting Started with REST Developer Guide.
- Coordinate with the partner reseller to begin testing transactions.
- Go live by contacting yourCybersourceaccount manager to transition your implementation from test to production.
Install the REST SDK
The
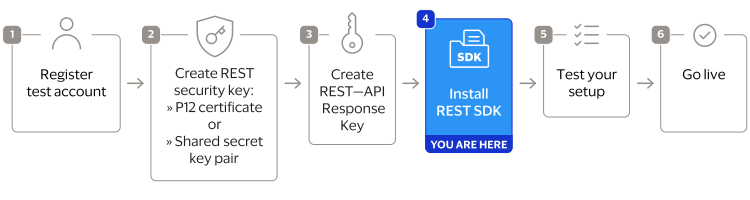
REST Client SDK
constructs JSON Web Token (JWT) messages for you to send to
Cybersource
. These messages are also encrypted using Message-Level
Encryption (MLE) by the SDK. When you receive a response message from Cybersource
, the SDK decrypts it using MLE.For more information about how to install the REST Client SDK into your system, see the
REST API related products
table in the Cybersource
GitHub.SDK Version
This table lists the minimum SDK versions that support the updated JWT message
construction and MLE requirements. Find your system’s processing language and
install the corresponding SDK version or a later version.
Language | Minimum SDK Version Required | MLE Enablement Instructions |
|---|---|---|
.NET Framework | v0.0.1.60 | |
.NET Standard or .NET Core | v0.0.1.52 | |
Java | v0.0.85 | |
Node | v0.0.75 | |
PHP | v0.0.69 | |
Python | v0.0.73 | |
Ruby | v0.0.81 |
Test Your Setup
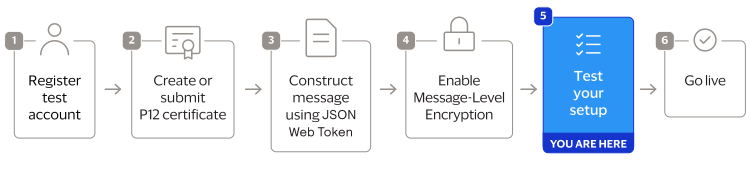
Cybersource
recommends that you test and verify
that your payment system can securely send and receive REST API messages before
transitioning to a production account. Use the test examples provided in this section to
test your set up. You should also test any additional API requests that you will use in
your live environment. Troubleshooting Using the REST SDK
You can also use the REST Client SDK to review how the SDK constructs, sends and
receives JWT messages with MLE. If you are receiving unsuccessful responses from
your custom integration, comparing how your system sends and receives messages to
the REST SDK can be helpful. For more information about how to install the REST
Client SDK into your system, see the Install the REST SDK
section.
Submit a Certificate Signing Request
Follow these steps to submit your own public PEM-formatted certificate signing
request (CSR).
- Log in to theBusiness Center:
- On the left navigation panel, choose
Payment Configuration > Key Management.
- Click+ Generate keyon the Key Management page.
- Under REST APIs, chooseREST – Certificate, and then clickGenerate key.If you are using aportfolioaccount, the Key options window appears, giving you the choice to create a meta key.For more information about how to create a meta key, see .
- Enter your public PEM-formatted certificate in the text box, then clickDownload key
.If you need to generate your own CSR and private key, run this command. In this example,merchantis your organization or merchant ID (MID). You can extract the certificate value by opening theexample.csrfile using a text editor application.openssl req -new -newkey rsa:2048 -keyout private_key.pem -out example.csr -sha256 -nodes -subj "/CN=merchant"
- (Optional) To convert your submitted CSR into a.p12file, run this command. In this example,merchantis your organization or merchant ID (MID).You can use the P12 certificate for testing using theREST API Referenceon the Developer Center.openssl pkcs12 -export -name "$(printf 'serialnumber=%s,cn=%s' "$(openssl x509 -inmerchant_certChain.pem -noout -serial | cut -d= -f2 | xxd -r -p)" "$(openssl x509 -inmerchant_certChain.pem -noout -subject | sed -n 's/.*CN=\([^/]*\).*/\1/p')" )" -outmerchant.p12 -inkey private_key.pem -inmerchant_certChain.pem
- When prompted, set a password for the.p12file.
To create or submit another key, click
Generate another key
. To view all of
your created keys, go to the Key Management page.IMPORTANT
Securely store your key's password in your system. These credentials
are required to implement certain products and you must be able to access them.
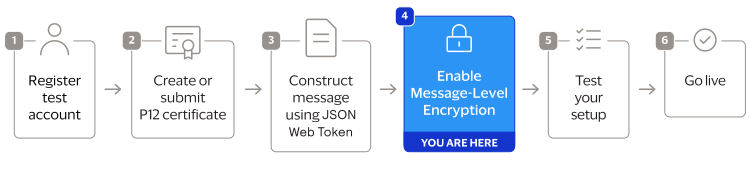
Enable Message-Level Encryption
IMPORTANT
There are additional tasks you must complete before you can
enable message-level encryption. See the Prerequisites for MLE section below.
Message-Level Encryption (MLE) enables you to store information or communicate
with other parties while helping to prevent uninvolved parties from understanding the
stored information. Enabling MLE requires you to create or submit a
P12
Certificate
for encrypting your requests and a REST – API Response MLE
key for decrypting received responses. If your organization is using meta keys, the
P12 Certificate
and REST – API Response MLE
must be created by the
same portfolio or merchant account.This section explains how to enable MLE with JWT messaging.
Step 4A: Create or Submit a REST—API Response MLE
Key
Before you can enable your system to support MLE, you must create or upload
a
REST—API response MLE
certificate. After creating or uploading the certificate,
you can extract the certificate's key to begin enabling MLE. If your organization is
using meta keys, the P12 certificate
and REST – API response MLE
key must
be created by the same portfolio or merchant account.Follow these steps to create or submit an API Response MLE certificate in
the
Business Center
:- Log in to theBusiness Center:
- On the left navigation panel, choose
Payment Configuration > Key Management.
- Click+ Generate keyon the Key Management page.
- Under REST APIs, chooseREST – API Response MLE, and then clickGenerate key.
- Choose one of these options to download your key:
- To create a new API response MLE certificate, clickDownload key
.
- To upload your own certificate, enter your public PEM-formatted certificate in the text box, and then clickDownload key
. The
.pemfile downloads to your desktop. If prompted by your system, approve the location to which the file downloads.
- If you are creating a certificate, the Set a Password window appears. Create a password for the certificate by entering the password into theNew PasswordandConfirm Passwordfields, and then clickGenerate key.The.p12file downloads to your desktop. If prompted by your system, approve the location to which the key downloads.
To create or submit another key, clickGenerate another key. To view all of your created keys, go to the Key Management page.IMPORTANTSecurely store the.p12file and password in your system. These credentials are required in order to implement certain products, and you must be able to access them.
- ClickCancel.The Key Management page appears.
- Click theKey Typefilter and chooseREST-API Response MLE.
- Click theExpires Atfilter and chooseAll Dates.
- ClickSearch.
- Find the REST–API Response key that you created in the Search Results table and save its key ID.The key ID is needed to test and configure your system to use MLE.
- Test Your REST–API Response MLE Key
- To test your REST–API Response key, see Test Your REST—API Response MLE Key.